
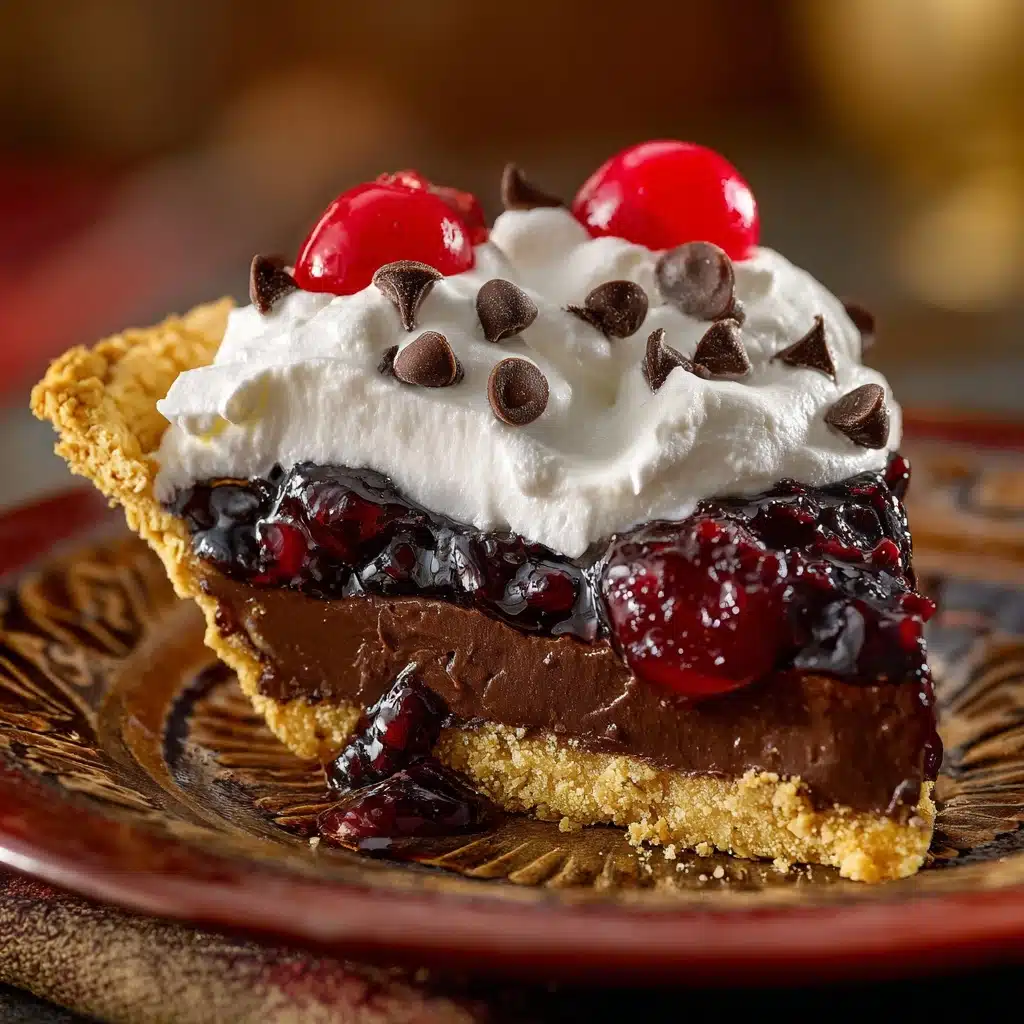
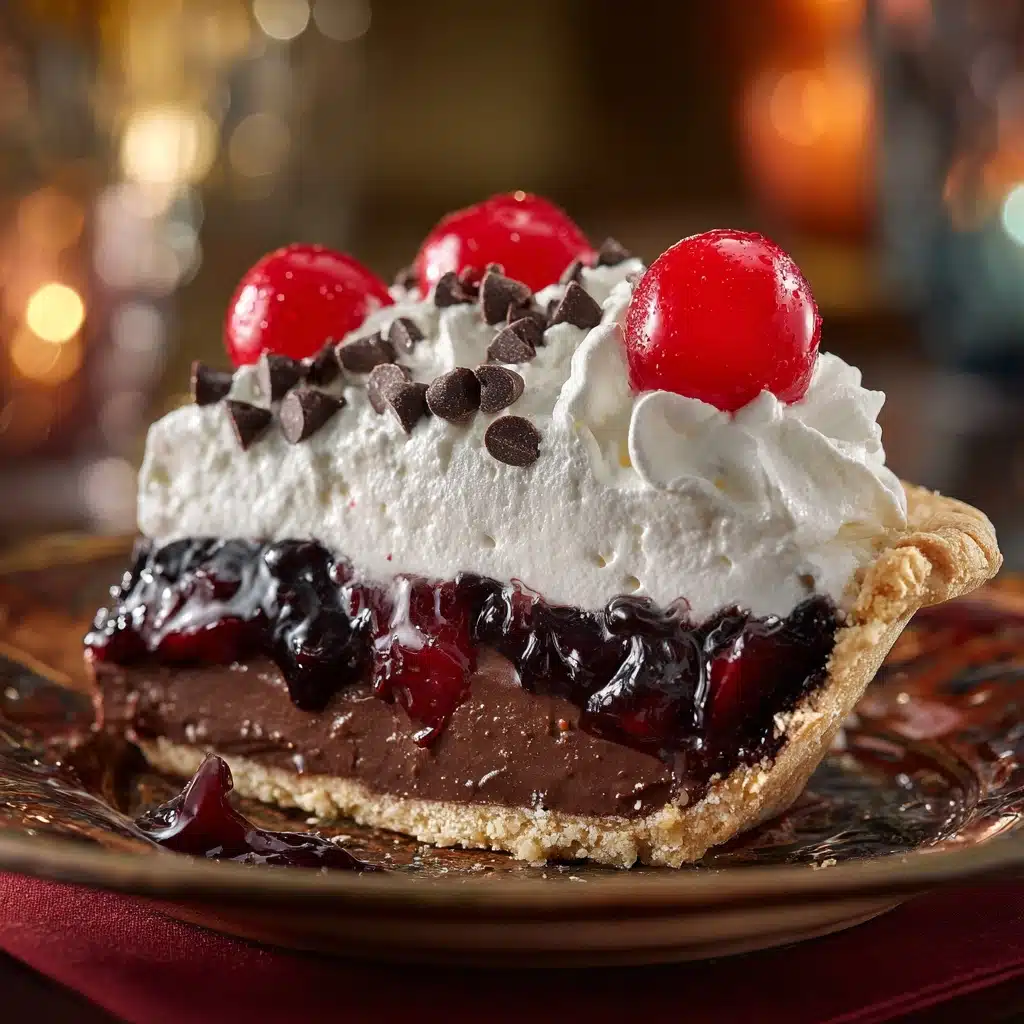
Chocolate Cherry Cream Pie Recipe
If you’re looking for a showstopper dessert that happens to be unbelievably easy, let me introduce you to your new favorite: Chocolate Cherry Cream Pie. This pie is a love letter to decadent chocolate and vibrant cherry, all nestled in a buttery crust with clouds of whipped cream. Every silky, fruity bite is pure celebration. It’s perfect for special gatherings, impressive enough for holidays—yet simple enough for a sweet Tuesday night treat.
Ingredients You’ll Need
The best part about Chocolate Cherry Cream Pie is just how straightforward the ingredient list is. Each addition brings something unforgettable—whether it’s the richness of the chocolate, the bright pop of cherries, or the creamy topping that ties it all together.
- 1 pre-baked 9-inch pie crust: Go homemade for bonus points, or grab a store-bought crust to keep things quick and easy—the perfect blank canvas for those dazzling flavors!
- 1 can (21 oz) cherry pie filling (or homemade): This gives the pie its iconic fruity layer; tart, sweet, and beautifully glossy.
- 1 box (3.9 oz) chocolate pudding mix: Instant chocolate pudding makes for a smooth, rich center you can whip up in minutes.
- 2 cups cold milk (for pudding mix): Cold milk helps your pudding set to the right luscious consistency.
- 1 ½ cups whipped cream (homemade or store-bought): The crowning glory; fluffy, light, and the ultimate contrast to that decadent chocolate.
- ½ cup chocolate chips (semi-sweet or dark): Sprinkled on top, these give delightful texture and extra bursts of chocolate.
- Fresh cherries for garnish (optional): Not only gorgeous, but a pop of freshness on every slice.
How to Make Chocolate Cherry Cream Pie
Step 1: Prepare the Crust
Start with a completely cooled, pre-baked pie crust. If you’re using a store-bought crust, just follow the package instructions for baking. Make sure it’s not warm—you don’t want it melting the layers you’re about to build.
Step 2: Add the Cherry Layer
Spread the cherry pie filling evenly over the bottom of your cooled pie crust. Take your time here; you want an even layer, so every bite delivers that bright cherry punch. Homemade filling adds a lovely personal touch, but store-bought works wonderfully for speed and ease.
Step 3: Whip Up the Chocolate Pudding
In a medium bowl, combine your chocolate pudding mix with the cold milk. Use a whisk and beat for about 2 minutes, until it’s thick but still spreadable. Let the pudding rest for a minute to finish thickening, then spread it gently over the cherry layer, completely covering those ruby jewels.
Step 4: Top with Whipped Cream
Gently spoon or pipe your whipped cream over the chocolate layer. Swirl into thick, fluffy peaks or smooth it out for a clean finish—either way, this is where your Chocolate Cherry Cream Pie starts to look truly irresistible.
Step 5: Add Chocolate Chips and Cherries
Sprinkle chocolate chips over the whipped cream. If you want to get fancy, dot the pie with fresh cherries for a stunning visual (and even more cherry flavor!). It turns an already beautiful pie into a true centerpiece.
Step 6: Chill and Set
Pop the whole pie into your refrigerator for at least two hours. This step lets the layers set, creating those neat, distinct slices where every layer holds its own.
Step 7: Slice and Serve
Once chilled, use a sharp knife to slice generous wedges. Serve cold and prepare for swoons of delight—this pie delivers everything you love in a single, creamy, crunchy, chocolate-cherry bite.
How to Serve Chocolate Cherry Cream Pie
Garnishes
Garnishing your Chocolate Cherry Cream Pie is half the fun! A scatter of extra chocolate chips, curls of chocolate made with a vegetable peeler, or those glossy fresh cherries all make the pie look party-ready. Even a dusting of cocoa powder adds elegance and that final flourish.
Side Dishes
This pie is rich enough to stand on its own but pairs beautifully with a scoop of vanilla ice cream or a bowl of fresh berries. If you’re serving it after dinner, a cup of espresso or hot coffee cuts through the sweetness and makes each bite even more special.
Creative Ways to Present
For a playful twist, try making mini Chocolate Cherry Cream Pies in individual tart shells—guaranteed to make your guests feel extra special. Or serve slices with a drizzle of cherry syrup for restaurant-style flair. If you’re hosting a party, tiny mason jars filled with pie layers make for adorable, portable servings!
Make Ahead and Storage
Storing Leftovers
Store leftover Chocolate Cherry Cream Pie tightly covered in the refrigerator. It keeps well for 2 to 3 days and the flavors meld beautifully overnight, so sneaking a slice for breakfast the next day is highly encouraged.
Freezing
You can freeze the pie before adding the whipped cream for best results. Just wrap it well in plastic and foil, and freeze for up to a month. When ready to eat, thaw overnight in the fridge, then finish with a layer of fresh whipped cream and your favorite garnishes.
Reheating
This pie is truly best served chilled, so reheating isn’t necessary. If your crust feels a bit soft after sitting in the fridge, a quick stint in the freezer for 15 minutes before serving can revive that lovely texture.
FAQs
Can I use homemade cherry pie filling?
Absolutely! Homemade cherry pie filling adds a wonderful, personal touch and lets you control the sweetness and tartness. Just be sure it’s fully cooled before using to keep your pie layers clean and neat.
Which chocolate pudding should I use?
Instant chocolate pudding works best for Chocolate Cherry Cream Pie, as it sets quickly and is delightfully smooth. Choose a high-quality brand for rich chocolate flavor, or try dark chocolate pudding if you want a more intense taste.
What kind of crust is best?
A classic buttery pastry crust is perfect, but graham cracker or even chocolate cookie crusts are delicious alternatives. Just remember to pre-bake and cool whatever crust you choose before assembling.
How far in advance can I make this pie?
You can assemble the pie up to a day in advance, making Chocolate Cherry Cream Pie a brilliant make-ahead option for entertaining. Hold off on garnishes until just before serving for the freshest look.
Can I make this pie gluten-free?
Yes! Simply swap the pie crust with a gluten-free variety and ensure your pudding mix is gluten-free as well. The rest of the ingredients are naturally gluten-free, so everyone can enjoy a slice.
Final Thoughts
If you love desserts that are as effortless as they are spectacular, you’ll want to make this Chocolate Cherry Cream Pie again and again. Each layer is a celebration, and it’s just waiting for you to dig in—so don’t wait for a special occasion, invite joy in with every slice!
Print
Chocolate Cherry Cream Pie Recipe
- Total Time: 2 hours 20 minutes
- Yield: 1 9-inch pie 1x
- Diet: Vegetarian
Description
Indulge in the decadent layers of chocolate and cherry with this delightful Chocolate Cherry Cream Pie. A perfect blend of rich chocolate pudding, luscious cherry filling, and fluffy whipped cream, all nestled in a buttery pie crust. This no-bake dessert is sure to impress at any gathering.
Ingredients
For the Pie:
- 1 pre-baked 9-inch pie crust
For the Filling:
- 1 can (21 oz) cherry pie filling (or homemade)
- 1 box (3.9 oz) chocolate pudding mix
- 2 cups cold milk (for pudding mix)
- 1 ½ cups whipped cream (homemade or store-bought)
- ½ cup chocolate chips (semi-sweet or dark)
- Fresh cherries for garnish (optional)
Instructions
- Ensure the pie crust is pre-baked and fully cooled before assembling. Place it aside to cool completely.
- Spread the cherry pie filling evenly across the bottom of the crust.
- Prepare the chocolate pudding according to the package instructions using cold milk. Let it thicken slightly, then spread it over the cherry layer.
- Gently spread whipped cream over the chocolate layer, creating a smooth, even topping.
- Sprinkle chocolate chips over the whipped cream, and add fresh cherries for extra flavor and presentation.
- Chill the pie in the refrigerator for at least 2 hours to allow the layers to set.
- Slice and serve chilled for a rich and creamy chocolate-cherry treat!
Notes
- This pie can be made a day in advance for convenience.
- Feel free to customize the toppings with nuts or additional fruit.
- Prep Time: 20 minutes
- Cook Time: 0 minutes
- Category: Dessert
- Method: No-Bake
- Cuisine: American
Nutrition
- Serving Size: 1 slice (1/8 of pie)
- Calories: 350
- Sugar: 22g
- Sodium: 300mg
- Fat: 16g
- Saturated Fat: 8g
- Unsaturated Fat: 6g
- Trans Fat: 0g
- Carbohydrates: 46g
- Fiber: 2g
- Protein: 4g
- Cholesterol: 15mg
Keywords: Chocolate Cherry Cream Pie, Dessert Recipe, No-Bake Pie, Cherry Pudding Pie
