
Perfect Cake Pops Recipe
Imagine biting into a delightful, bite-sized treat where moist, flavorful cake blends perfectly with creamy frosting, covered in a crisp candy shell and topped with colorful sprinkles. That’s the experience you get with Perfect Cake Pops! Whether you’re making them for a party, a bake sale, or just because you’re craving something sweet and fun, these cake pops are guaranteed to brighten your day. Once you know a few secrets for shaping, dipping, and decorating, you’ll be churning out bakery-worthy cake pops right from your own kitchen.
Ingredients You’ll Need
Simple ingredients are all you need for Perfect Cake Pops, and each one plays a key role in creating the right balance of flavor and texture. Don’t substitute or skip these essentials if you want the best results—just a few grocery store items transform into something truly magical!
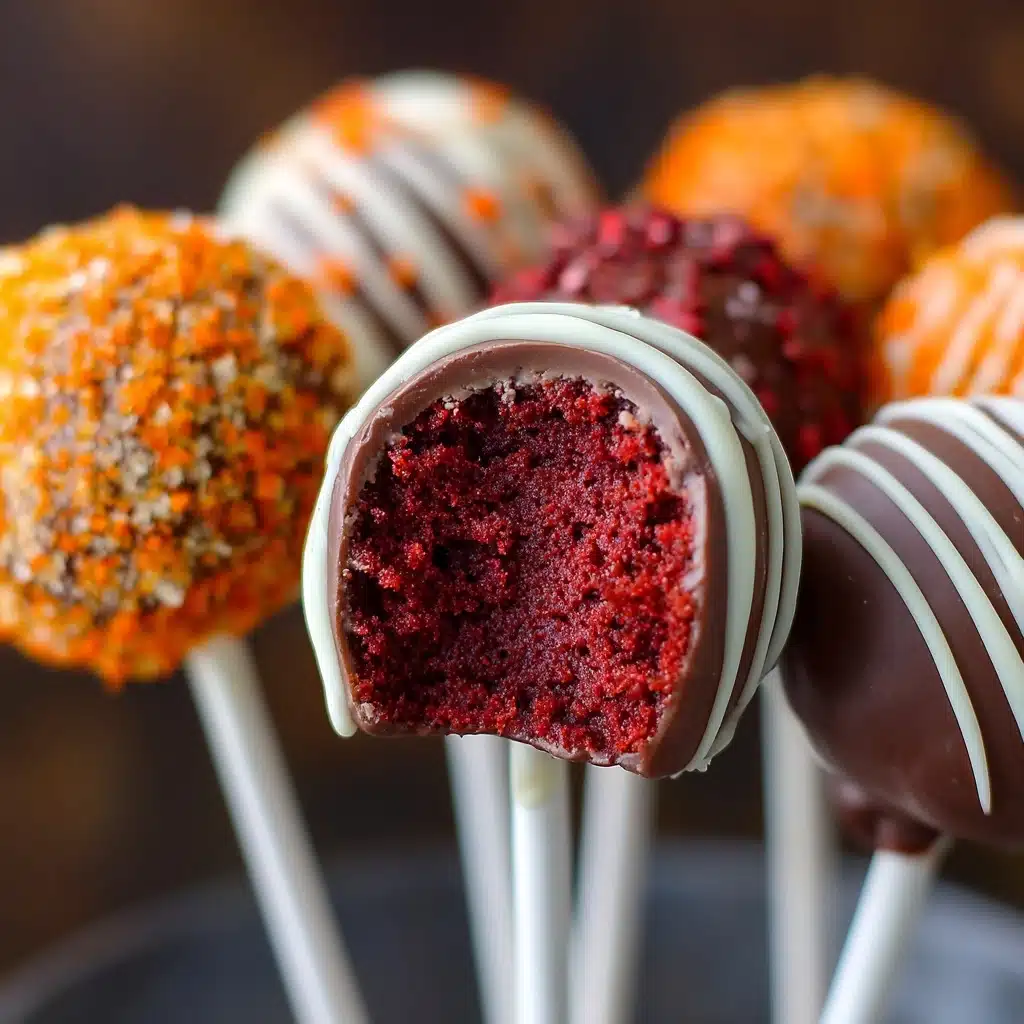
- Cake mix: Go classic with vanilla or chocolate, or experiment with red velvet or lemon for a fresh spin—your favorite flavor will shine as the base.
- Ingredients to prepare cake mix: Usually oil or butter, eggs, and water; make sure to check your boxed mix instructions and use the freshest eggs for extra richness.
- Tub frosting (not whipped): Just use half the can! A creamy frosting helps bind the cake together but avoid whipped versions for the right consistency.
- Cake pop sticks: These lollipop-style sticks are essential for popping the finished treats upright and making them fun to eat.
- Candy coating (like Candyquik): A smooth, meltable coating that gives the pops their signature sheen and crunch—far better than regular chocolate or baking chips.
- Cake pop holder or Styrofoam board: Keeps your freshly dipped pops standing tall while the coating dries and sets perfectly.
- Optional sprinkles: Add a festive, playful finish and a touch of crunch; choose colors to match your event or your mood!
How to Make Perfect Cake Pops
Step 1: Bake and Cool Your Cake
Prepare the cake mix according to the package directions, using the correct amounts of oil, eggs, and water for your chosen flavor. Bake it in any pan you have—shape doesn’t matter since you’ll crumble it up later. Once your cake is out of the oven, let it cool completely; this step is essential to prevent the frosting from melting when you mix them together later.
Step 2: Crumble the Cake Like a Pro
When your cake is cool, break it into chunks and crumble it using your hands into a big mixing bowl. For truly Perfect Cake Pops, be sure to keep crumbling until the texture is super fine—think sand-like and even. Rolling handfuls of cake between your palms is the best way to get those perfect crumbs that stick together and form smooth balls.
Step 3: Mix In the Frosting
Add frosting by the spoonful, mixing thoroughly with your hands after each addition. You only need about half of a standard can. To make sure your mixture is just right, roll a bit into a ball and gently squeeze it—when no cracks appear, you’ve reached the perfect consistency. Go slow and check often; too much frosting can make the pops too soft.
Step 4: Shape and Chill
Use a 2-inch cookie scoop or a tablespoon to form cake balls, rolling them in your hands until they’re nice and round. Place the cake balls on a lined baking sheet and chill them in the refrigerator for about four hours. This cooling time is crucial so the cake pops hold their shape when you dip them. If you need to pause, you can cover and freeze them at this stage—just be sure to let them thaw in the refrigerator before coating.
Step 5: Melt and Prep Your Candy Coating
While your cake balls chill, melt your candy coating according to the package instructions. Candyquik gives an ultra-smooth, glossy finish and is much easier to work with than chocolate chips or almond bark. Pour the melted coating into a deep bowl or mug to make dipping a breeze.
Step 6: Secure Cake Pops on Sticks
To keep those Perfect Cake Pops from slipping off the sticks, dip each stick about three-quarters of an inch into the melted candy coating. Insert the stick into the flat part of the cake ball, then stand the ball upright in your cake pop holder or upright in a Styrofoam block. Let them set for about 10 minutes; this seals the base and makes your pops sturdy.
Step 7: Dip, Decorate, and Dry
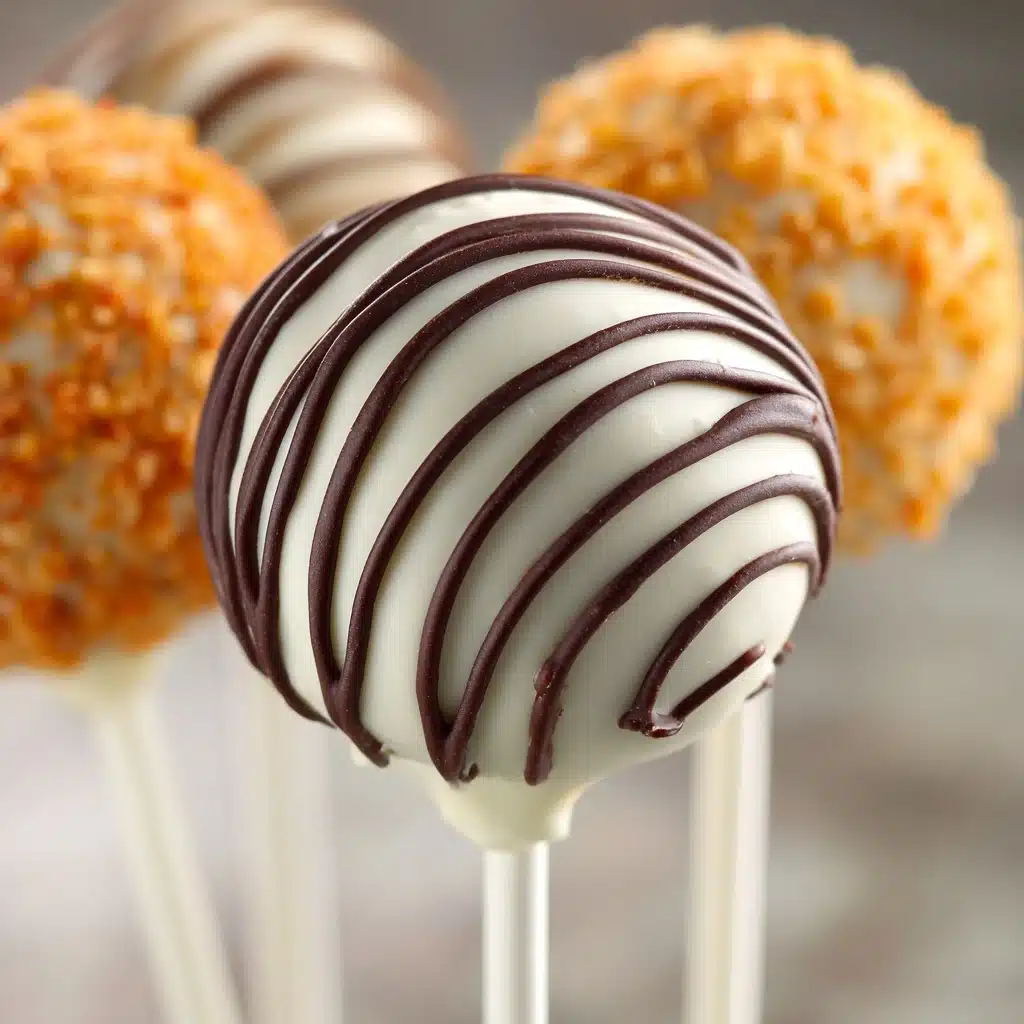
One at a time, dip each cake pop into the candy coating, turning gently so it’s evenly covered (but don’t coat all the way down to the stick—leave the seal exposed for best results). Let any excess drip off by tapping gently against the side of the bowl. If you’re adding sprinkles, do it right away while the coating is still wet. Place your pops upright in the holder and let them dry and harden completely. For fancy striped decorations, let the first layer harden, then drizzle with a contrasting color.
How to Serve Perfect Cake Pops
Garnishes
Dress up your Perfect Cake Pops with a shower of rainbow sprinkles, shimmering sugars, crushed cookies, or even a contrasting drizzle of melted candy coating. For themed parties, choose sprinkles that match your color scheme or holiday—everyone loves a festive touch!
Side Dishes
While Perfect Cake Pops are a centerpiece on their own, consider serving them alongside a platter of fresh fruit, a bowl of ice cream, or a big mug of hot cocoa for a truly memorable dessert spread. The bites contrast wonderfully with both bright, fruity flavors and creamy, indulgent treats.
Creative Ways to Present
Show off your handiwork by arranging cake pops in a decorated Styrofoam block, a vase filled with colorful candies, or a whimsical display stand. Stagger different heights for extra visual pop, or wrap each pop in clear bags tied with ribbons to make sweet party favors—almost too pretty to eat (almost)!
Make Ahead and Storage
Storing Leftovers
Keep any leftover Perfect Cake Pops in an airtight container at room temperature for up to two days, or in the refrigerator for up to a week. Make sure they’re in a single layer so the coatings don’t rub off or crack against each other.
Freezing
You can freeze undipped cake balls for up to six weeks—just let them thaw overnight in the refrigerator before dipping. If freezing fully finished cake pops, wrap them tightly in plastic wrap and seal in an airtight container; let them come to room temperature before serving for best taste and texture.
Reheating
Since Perfect Cake Pops are best enjoyed at room temperature, there’s no need to reheat. Simply let chilled or frozen pops sit on the counter until they come to the right temperature—this brings out the best in both texture and flavor.
FAQs
Why do my cake pops crack after dipping?
This usually happens if the cake balls are too cold and the candy coating is too warm. Let the balls sit in the refrigerator (not the freezer) before dipping, and avoid drastic temperature changes for the smoothest finish.
What if my cake balls keep falling off the stick?
Make sure to seal the stick by dipping it in melted candy coating before inserting it into the cake ball. Also, work with chilled cake balls, and don’t add too much frosting—a stiffer mixture holds together better.
Can I use homemade cake and frosting?
Absolutely! While boxed mix and canned frosting make Perfect Cake Pops quick, you can swap in your favorite from-scratch recipes for a truly custom flavor. Just make sure the cake is not too moist or too crumbly, and use a creamy (not whipped) frosting for binding.
How far in advance can I make cake pops?
You can make and store finished cake pops up to a week ahead, or freeze undipped cake balls for several weeks. Just plan to decorate no more than two days before your event for the brightest colors and freshest flavor.
What’s the best way to transport Perfect Cake Pops?
Arrange pops upright in a sturdy box or carrier with small holes poked in the top, or nestle each pop individually in its own little cupcake liner for extra cushioning. This ensures they travel safely and arrive looking as gorgeous as when you made them.
Final Thoughts
It’s truly hard to resist the charm of Perfect Cake Pops—they’re cute, colorful, and absolutely irresistible! Grab your favorite cake mix and frosting, gather your decorations, and give this joyful treat a try. You’ll be amazed at how fun (and delicious) making cake pops can be, and everyone lucky enough to sample your creations will agree: these are the Perfect Cake Pops they’ve been dreaming of.
Print
Perfect Cake Pops Recipe
- Total Time: 4 hours
- Yield: 30 cake pops 1x
- Diet: Vegetarian
Description
Learn how to make the perfect cake pops at home with this simple and delicious recipe. These cake pops are great for parties, events, or just as a fun treat for yourself. Follow these step-by-step instructions to create a delightful dessert that everyone will love.
Ingredients
Cake Balls:
- 1 box cake mix (any flavor)
- Ingredients to prepare cake mix (usually oil or butter, eggs and water)
- tub frosting in a flavor to complement the cake – NOT whipped (only 1/2 can is needed)
Additional Ingredients:
- cake pop sticks
- candy coating (recommended instead of baking chips, we used Candyquik)
- Cake Pop holder or Styrofoam board for holding upright while they dry
- Optional: Sprinkles for decorating
Instructions
- Bake the Cake: Bake cake according to package directions. Any shape or pan is fine.
- Crumble Cake: Cool completely, then crumble cake into fine crumbs in a large bowl.
- Add Frosting: Gradually add icing to the cake crumbs, mixing until fully incorporated.
- Form Cake Balls: Use a cookie scoop to form mixture into about 30 cake balls and chill.
- Dip Cake Pops: Melt candy coating, dip cake pop sticks, then dip cake balls and decorate as desired.
Notes
- For best results, ensure cake crumbs are very fine for a smooth texture.
- Chill cake balls before dipping to help them hold their shape.
- Seal the tip of the stick to prevent oils from cake pops from affecting the coating.
- Prep Time: 30 minutes
- Cook Time: 30 minutes
- Category: Dessert
- Method: Baking
- Cuisine: American
Nutrition
- Serving Size: 1 cake pop
- Calories: 120
- Sugar: 10g
- Sodium: 100mg
- Fat: 5g
- Saturated Fat: 3g
- Unsaturated Fat: 2g
- Trans Fat: 0g
- Carbohydrates: 18g
- Fiber: 1g
- Protein: 1g
- Cholesterol: 10mg
Keywords: cake pops, dessert, party, candy coating, baking

