
Chicken Caesar Wraps with Crispy Panko Chicken Recipe
Introduction
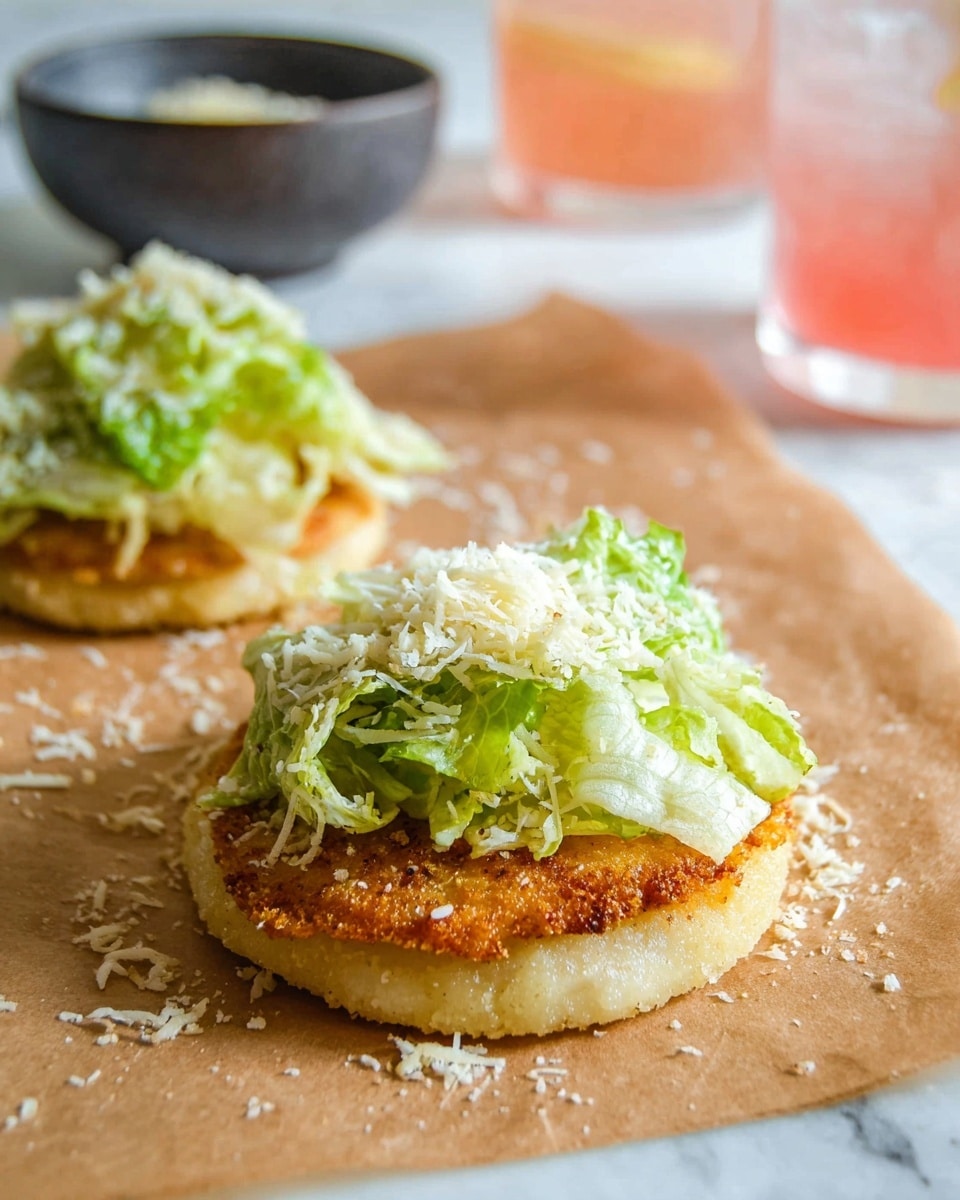
This Chicken Caesar Wrap combines the savory flavors of seasoned ground chicken with the crisp freshness of a classic Caesar salad. Wrapped in a golden, crispy tortilla, it makes a satisfying meal that’s perfect for lunch or a light dinner.
Ingredients
- 1 pound ground chicken
- 1 teaspoon garlic powder
- 1 teaspoon onion powder
- 1 teaspoon smoked paprika
- 1 teaspoon salt
- ½ teaspoon black pepper
- 4 large flour tortillas
- 1 large egg (beaten)
- 1 cup panko breadcrumbs
- 2 tablespoons olive oil (for frying)
- 1 Caesar salad kit (romaine, dressing, parmesan, croutons)
Instructions
- Step 1: In a bowl, combine the ground chicken with garlic powder, onion powder, smoked paprika, salt, and black pepper. Mix well to evenly distribute the seasonings.
- Step 2: Lay out the flour tortillas and spread a thin, even layer of the seasoned ground chicken onto one side of each tortilla. Press the chicken down so it adheres properly.
- Step 3: Lightly brush the chicken layer on each tortilla with the beaten egg. This will help the breadcrumbs stick and create a crispy coating.
- Step 4: Sprinkle panko breadcrumbs generously over the egg-washed chicken layer and press them in firmly to coat completely.
- Step 5: Heat the olive oil in a skillet over medium heat. Carefully place each tortilla chicken-side down in the skillet.
- Step 6: Cook for 4 to 5 minutes until the chicken is golden brown and crispy. Then flip the tortilla and warm the other side for 1 to 2 minutes. Remove from the skillet and set aside.
- Step 7: Prepare the Caesar salad according to the kit instructions by tossing the romaine lettuce with dressing, parmesan, and croutons.
- Step 8: Spoon some of the prepared Caesar salad onto the chicken side of each tortilla.
- Step 9: Fold the tortilla like a wrap or taco and serve immediately to enjoy the warm, crunchy contrast with the fresh salad.
Tips & Variations
- For extra flavor, add a squeeze of lemon juice to the Caesar salad before assembling the wrap.
- You can substitute ground turkey or chicken breast for a leaner option.
- Try adding sliced avocado or crispy bacon inside the wrap for added richness.
- Use whole wheat tortillas to increase fiber and add a nutty flavor.
Storage
These wraps are best enjoyed fresh for optimal crunch. If you need to store leftovers, wrap them tightly in foil and refrigerate for up to 1 day. Reheat gently in a skillet or oven to help maintain the crispy coating. Avoid microwaving as it may make the coating soggy.
How to Serve

Serve this delicious recipe with your favorite sides.
FAQs
Can I prepare the wraps ahead of time?
You can prepare the chicken and salad separately in advance, but for the best texture, assemble and fry the wraps just before serving.
What if I don’t have panko breadcrumbs?
Regular breadcrumbs can be used as a substitute, but panko offers a lighter, crispier texture that enhances the wrap’s crunch.
Print
Chicken Caesar Wraps with Crispy Panko Chicken Recipe
- Total Time: 25 minutes
- Yield: 4 wraps 1x
Description
This Chicken Caesar Wrap recipe features seasoned ground chicken coated in crispy panko breadcrumbs, pan-fried to golden perfection and paired with a classic Caesar salad for a crunchy, flavorful wrap that’s perfect for a quick lunch or dinner.
Ingredients
Chicken Mixture
- 1 pound ground chicken
- 1 teaspoon garlic powder
- 1 teaspoon onion powder
- 1 teaspoon smoked paprika
- 1 teaspoon salt
- ½ teaspoon black pepper
Wrapping & Coating
- 4 large flour tortillas
- 1 large egg (beaten)
- 1 cup panko breadcrumbs
- 2 Tablespoons olive oil (for frying)
Salad
- 1 Caesar salad kit (includes romaine lettuce, Caesar dressing, parmesan cheese, and croutons)
Instructions
- Season the chicken: In a mixing bowl, combine the ground chicken with garlic powder, onion powder, smoked paprika, salt, and black pepper until well incorporated.
- Assemble tortillas with chicken: Spread a thin, even layer of the seasoned ground chicken mixture onto one side of each flour tortilla, pressing it down firmly so that it adheres properly.
- Brush egg wash: Lightly brush the beaten egg over the chicken layer on each tortilla. This helps the breadcrumbs stick and creates a crispy crust.
- Press breadcrumbs: Sprinkle panko breadcrumbs evenly over the egg-washed chicken layer, pressing gently to ensure full coating.
- Fry the wraps: Heat olive oil in a skillet over medium heat. Carefully place each tortilla chicken-side down into the skillet. Cook for 4 to 5 minutes until the breadcrumbs turn golden brown and crispy.
- Flip and warm: Flip the tortillas over to warm the plain tortilla side for 1 to 2 minutes, ensuring the wrap is heated throughout. Remove from skillet and set aside.
- Prepare Caesar salad: Toss the romaine lettuce, Caesar dressing, parmesan cheese, and croutons from the salad kit until well combined.
- Add salad to wraps: Spoon some of the prepared Caesar salad on top of the chicken side of each tortilla.
- Fold and serve: Fold the wraps like a taco or roll them up. Serve immediately while the chicken crust is still warm and crunchy, enjoying the blend of crispy chicken and fresh Caesar salad.
Notes
- Use medium heat when frying to avoid burning the breadcrumbs while ensuring the chicken cooks thoroughly.
- Make sure the chicken layer on the tortilla is thin to allow even cooking and crispiness.
- For a lower-fat version, consider baking the wraps in the oven at 400°F for 10-12 minutes instead of frying.
- Serve wraps immediately for the best texture, as the crispy chicken may lose crunch if left to sit.
- You can substitute ground turkey for chicken if preferred.
- Using a Caesar salad kit simplifies prep but fresh romaine, homemade dressing, and freshly grated parmesan are great alternatives.
- Prep Time: 15 minutes
- Cook Time: 10 minutes
- Category: Wraps & Sandwiches
- Method: Frying
- Cuisine: American
Keywords: Chicken Caesar Wrap, Crispy Chicken Wrap, Caesar Salad Wrap, Panko Crusted Chicken, Quick Wrap Recipe, Pan-fried Wrap


