
Chocolate Hazelnut Thumbprint Cookies Recipe
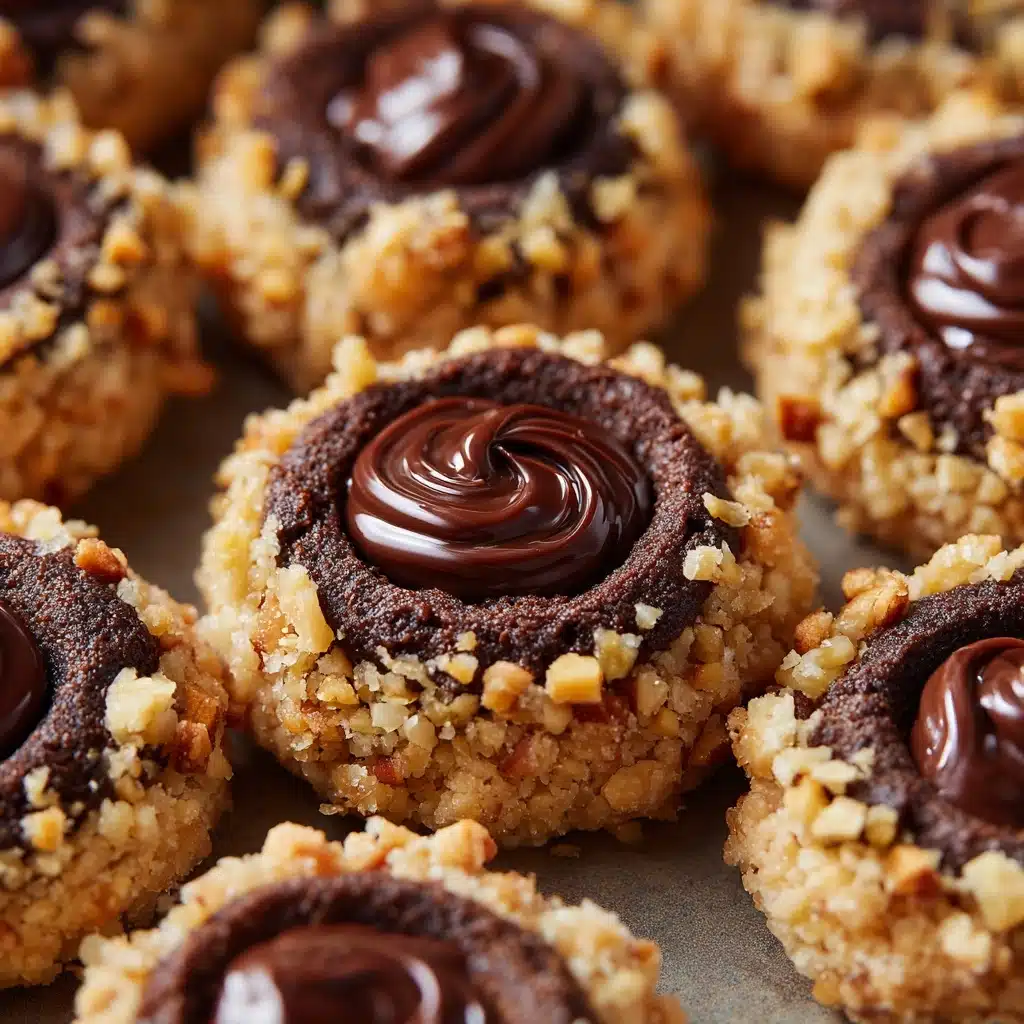
There’s something undeniably magical about Chocolate Hazelnut Thumbprint Cookies: they’re rich, chocolatey, generously studded with toasted hazelnuts, and filled with a glossy pool of chocolate hazelnut spread. Each bite is a perfect blend of melt-in-your-mouth cookie, crunchy nuts, and creamy filling—pure bliss for any chocolate lover. Whether you’re baking for a special celebration, making edible gifts, or just treating yourself on a cozy afternoon, these cookies have a way of making any moment feel truly special.

Ingredients You’ll Need
The beauty of Chocolate Hazelnut Thumbprint Cookies lies in their simple yet purposeful ingredients. Each component plays a starring role, building layers of flavor, texture, and that irresistible finish you’ll crave long after the last crumb is gone.
- All-purpose flour: Forms the tender base and structure for the cookies, making them sturdy enough to hold the luscious filling without being dense.
- Dutch processed cocoa powder: Gives a deep, luxurious chocolate flavor and a beautiful dark color—much richer than regular cocoa.
- Salt: A small but impactful touch that balances the sweetness and brings out all the rich flavors.
- Unsalted butter: Adds richness and that signature melt-in-your-mouth texture. Room-temperature butter creams beautifully to create a fluffy cookie dough.
- Egg yolk: Lends extra richness and contributes to that golden hue and soft crumb.
- Milk: Helps to blend and moisten the dough, ensuring a luxurious consistency.
- Powdered sugar: Melts seamlessly into the dough for a fine, tender crumb and subtle sweetness.
- Vanilla extract: Enhances both the chocolate and hazelnut notes, adding warmth and depth.
- Finely chopped toasted hazelnuts: Deliver crunch, nuttiness and beautiful visual appeal—toast them for extra aroma!
- Chocolate hazelnut spread: The decadent finishing touch. Use your favorite brand for an ultra-creamy, glossy center.
How to Make Chocolate Hazelnut Thumbprint Cookies
Step 1: Prep Your Oven and Trays
Preheat your oven to 180C (355F) if you have a fan-assisted oven, or 160C (320F) if you don’t. Line two large baking trays with baking paper so you’re ready to go—this makes removing and cooling the cookies a breeze and saves on washing up later.
Step 2: Combine Dry Ingredients
In a medium mixing bowl, whisk together the flour, Dutch processed cocoa powder, and salt. This step isn’t just about combining—it’s about aerating the cocoa and flour so your cookies bake up beautifully even. Set the bowl aside for now.
Step 3: Cream Butter, Sugar, and Wet Ingredients
Add your unsalted butter, powdered sugar, egg yolk, milk, and vanilla extract to a separate bowl. Beat everything on high speed until the mixture turns fluffy and pale—usually about three minutes. This incorporates air for that light, delicate cookie texture.
Step 4: Form and Measure the Cookie Dough
Using an ice cream scoop (the OXO Good Grips Small scoop works beautifully), portion out the dough into about thirty balls, each roughly 1 1/2 tablespoons in size. Rolling ensures even baking, and the scoop helps keep your hands clean and the cookies uniform.
Step 5: Coat in Hazelnuts and Bake
Roll every dough ball generously in the chopped toasted hazelnuts. Place them evenly spaced on your prepared trays—no need to flatten! Bake each tray, one at a time, on the middle rack for about 8 minutes. They’ll spread and flatten perfectly on their own, so hands off for this step!
Step 6: Create the Signature Thumbprint
Right after coming out of the oven, use a measuring tablespoon to gently press an indent into the center of each cookie. For that perfectly round look, shuffle a round cookie cutter (a bit larger than the cookie) around each one while they’re still hot. Let the cookies cool completely to set that tender crumb.
Step 7: Fill with Chocolate Hazelnut Spread
Once cooled, spoon or pipe your favorite chocolate hazelnut spread into each thumbprint indent. Allow the cookies to set until the filling is glossy and firm, then get ready for the first irresistible bite!
How to Serve Chocolate Hazelnut Thumbprint Cookies
Garnishes
For a bakery-worthy finish, sprinkle a few extra chopped toasted hazelnuts over the filled cookies, add a dusting of powdered sugar, or even a small chocolate curl in the center for flair. These little touches make Chocolate Hazelnut Thumbprint Cookies as beautiful as they are delicious.
Side Dishes
The rich flavors of these cookies pair wonderfully with fresh berries or a fruit compote for contrast. A scoop of vanilla or coffee ice cream elevates any serving into a restaurant-style dessert experience, while a cup of hot coffee or an espresso is always a safe (and scrumptious) bet for sipping alongside.
Creative Ways to Present
Arrange your Chocolate Hazelnut Thumbprint Cookies in a rustic tin lined with parchment for edible gifting, or display them on a stunning cake stand at your next gathering. For the holidays, nestle them among other cookies for an impressive dessert platter, or wrap them in cellophane bags tied with ribbon for homemade party favors that everyone will adore.
Make Ahead and Storage
Storing Leftovers
To keep your cookies fresh, store them in an airtight container at room temperature for up to 5 days. If your kitchen runs warm, you can stash them in the fridge—just bring them back to room temperature for the perfect texture before serving.
Freezing
Chocolate Hazelnut Thumbprint Cookies are freezer-friendly! For best results, freeze the unfilled cookies once cooled on a baking sheet, then transfer them to a resealable bag or container. Fill with chocolate hazelnut spread after thawing to preserve that creamy texture.
Reheating
If you’d love that fresh-from-the-oven feel, warm cookies (unfilled) in a moderate oven for 2–3 minutes before adding the hazelnut spread. If they’re already filled, a very short burst in the microwave brings back the fudgy edge, but don’t overdo it or the center will melt.
FAQs
Can I use regular cocoa powder instead of Dutch processed?
While natural cocoa will work, Dutch processed cocoa gives a richer color and a deeper, mellower chocolate flavor. If you only have regular cocoa, go ahead and use it—just note the cookies will be slightly lighter in color and tangier in taste.
What’s the best chocolate hazelnut spread to use?
Any classic chocolate hazelnut spread will shine in Chocolate Hazelnut Thumbprint Cookies. Nutella is a sure favorite, but you can explore other brands or even go for organic or dairy-free options if you prefer.
Can I make these cookies gluten-free?
Absolutely! You can swap the all-purpose flour for your favorite 1-to-1 gluten-free baking blend. The cookies may be slightly more delicate, so handle them gently when creating the thumbprint and filling them.
How do I toast hazelnuts?
For the richest flavor, spread raw hazelnuts on a baking sheet and toast in a preheated oven at 180C (355F) for about 8–10 minutes, shaking halfway through. Rub off excess skins using a clean kitchen towel after they cool, then chop finely for rolling.
Can I freeze the finished cookies with the filling?
You can, but the texture of some chocolate hazelnut spreads may change a bit after freezing. It’s usually better to freeze just the cookies and add the filling once thawed for optimal creaminess and shine.
Final Thoughts
There’s just something delightful—and dare I say, a little addicting—about homemade Chocolate Hazelnut Thumbprint Cookies. With their fudgy base, crunchy hazelnut coating, and smooth, decadent filling, they’re always a hit with friends and family. If you love a hint of nostalgia and a lot of chocolatey satisfaction, don’t wait to bake a batch and share them around your table!
Print
Chocolate Hazelnut Thumbprint Cookies Recipe
- Total Time: 30 minutes
- Yield: 30 cookies 1x
- Diet: Vegetarian
Description
Indulge in these decadent Chocolate Hazelnut Thumbprint Cookies that are a delightful combination of rich cocoa, toasted hazelnuts, and creamy chocolate hazelnut spread. They are perfect for any occasion, from holiday gatherings to afternoon tea.
Ingredients
Dry Ingredients:
- 200 g all-purpose flour (plain flour)
- 30 g Dutch processed cocoa powder
- 1/4 tsp salt
Wet Ingredients:
- 250 g unsalted butter
- 1 egg yolk
- 40 g milk
- 115 g powdered sugar
- 2 tsp vanilla extract
Additional Ingredients:
- 125 g finely chopped hazelnuts (toasted)
- 100 g chocolate hazelnut spread
Instructions
- Hazelnut Cookies – Preheat your oven and prepare baking trays. Combine dry ingredients. Cream butter and sugar until fluffy. Roll out cookie balls. Roll in hazelnuts and bake. Indent the cookies after baking. Fill with hazelnut spread and let set.
Notes
- Toast the hazelnuts before chopping for enhanced flavor.
- Use a small ice cream scoop for uniform cookie size.
- Allow the cookies to cool completely before filling with chocolate hazelnut spread.
- Prep Time: 20 minutes
- Cook Time: 8 minutes
- Category: Dessert
- Method: Baking
- Cuisine: American
Nutrition
- Serving Size: 1 cookie
- Calories: 150
- Sugar: 7g
- Sodium: 40mg
- Fat: 10g
- Saturated Fat: 5g
- Unsaturated Fat: 4g
- Trans Fat: 0g
- Carbohydrates: 15g
- Fiber: 1g
- Protein: 2g
- Cholesterol: 20mg
Keywords: Chocolate Hazelnut Thumbprint Cookies, Hazelnut Cookies, Chocolate Cookies, Thumbprint Cookies, Holiday Baking


