
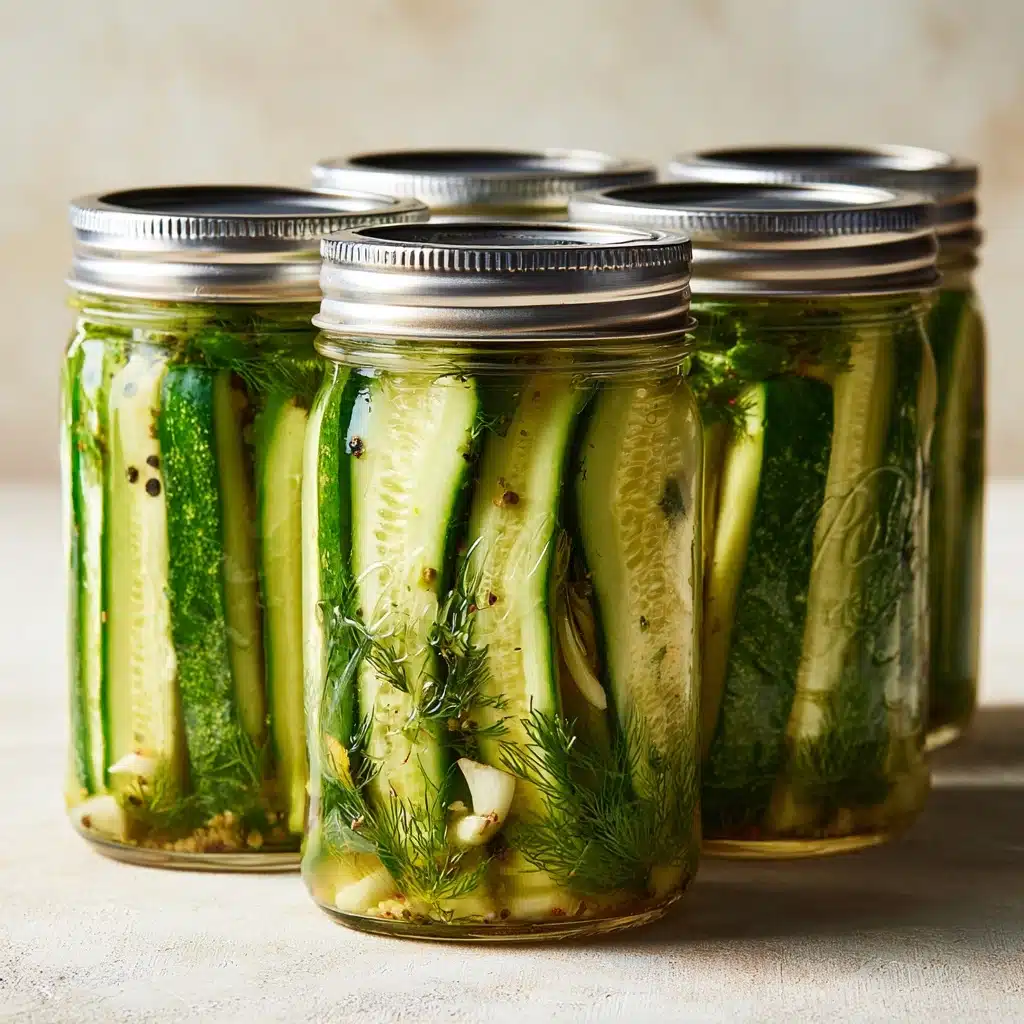
Crunchy Garlic Dill Pickles Recipe
If you are searching for the perfect snack or condiment that combines a satisfying crunch with bold, fresh flavors, look no further than these Crunchy Garlic Dill Pickles. Bursting with fragrant dill, pungent garlic, and a zesty vinegar brine, they offer a tangy, irresistible bite every time. Whether you’re packing sandwiches, jazzing up your cheeseboard, or just craving something bright and crisp, these pickles are a delightful, trusty companion to have in your kitchen arsenal.
Ingredients You’ll Need
Gathering the right ingredients is simple but crucial, as each element plays a distinct role in creating that unforgettable taste and texture of the pickles. From the sharpness of white vinegar to the earthy touch of dill seed, every component adds its unique magic.
- 1/2 cup canning salt: Coarse canning salt is essential for a clean, crisp pickle without cloudiness in the brine.
- 4 1/2 cups white vinegar: This provides the classic tang and acts as a preservative for those satisfying pickles.
- 8 cups water: Dilutes the vinegar just enough to balance acidity and enhance crunch.
- 6 teaspoons minced garlic: Fresh garlic cloves add a vibrant pungency and depth of flavor.
- 5 tablespoons dill seed: Not dill weed but the seeds, which impart a warm, subtly bitter dilliness critical to these pickles.
- Pickling cucumbers (approx. 18-20): Choose firm, fresh cucumbers to maintain that essential crisp crunch once pickled.
How to Make Crunchy Garlic Dill Pickles
Step 1: Prepare the Canning Jars
Before diving into the pickling, preheat your oven to 250 degrees and thoroughly wash your canning jars in hot, soapy water. Placing the jars upside down on a lined cookie sheet in the oven keeps them hot, which is vital for proper sealing later. This step ensures your jars are sterile and ready to welcome those vibrant pickles.
Step 2: Prep the Cucumbers
Wash your cucumbers well, trimming off the stem and bottom ends for a clean base. Slice the cucumbers as you prefer—spears, chips, or sandwich slices all work wonderfully. Packing them tightly into the hot jars—and placing the hot jars back into the oven as you fill them—helps maintain optimum temperature for sealing while securing a neat, organized appearance in every jar.
Step 3: Add Garlic and Dill Seed
To each jar, add one teaspoon of minced garlic and about three-quarters of a tablespoon of dill seed. These two ingredients infuse the pickles with that unmistakable Crunchy Garlic Dill Pickles flavor profile, marrying the bright herbaceous notes with a bold garlic punch.
Step 4: Heat the Brine
In a large saucepan, combine the white vinegar, water, and canning salt, bringing it to a rolling boil while stirring to dissolve the salt completely. Meanwhile, soften your flat lid seals by placing them in a separate bowl of nearly boiling water for five minutes. This guarantees your lids will seal tightly, keeping your pickles fresh and flavorful.
Step 5: Fill the Jars and Seal
Carefully remove the hot jars from the oven and pour the boiling brine into each, covering the cucumbers fully and leaving about half an inch of headspace. Removing air bubbles with a plastic knife or canning tool ensures a secure seal without trapped air pockets. Quickly clean the rims, place the softened lids on, and finger-tighten the rings. Invert the jars on a towel for five minutes, then right them again, listening closely for that reassuring clicking sound which confirms your Crunchy Garlic Dill Pickles jars have sealed properly.
Step 6: Optional Water Bath Canning
If you wish to store your pickles at room temperature for a longer period, water bath canning the sealed jars for 15 minutes according to USDA guidelines adds an extra layer of preservation and safety. Once cool, store the jars away from light and heat for up to two weeks before opening to allow full flavor development.
How to Serve Crunchy Garlic Dill Pickles

Garnishes
A sprinkle of freshly chopped dill or a few thin slices of garlic on top highlight the star flavors in your Crunchy Garlic Dill Pickles. Adding a few mustard seeds or peppercorns alongside elevates their visual appeal and gives an extra zing to each bite.
Side Dishes
These pickles are a knockout with classic barbecue fare like pulled pork sandwiches, bratwurst, or crispy fried chicken. Their tanginess cuts through rich dishes to refresh your palate and add a welcomed texture contrast.
Creative Ways to Present
Try serving your Crunchy Garlic Dill Pickles as part of a cheese board alongside sharp cheddar and creamy brie, or dice them up and mix into potato salad and deviled eggs for added crunch and flavor bursts. These pickles invite creativity and can transform simple dishes into show-stoppers.
Make Ahead and Storage
Storing Leftovers
Once opened, keep your jars refrigerated and tightly sealed to preserve their crunch and flavor. They typically stay delicious for up to four weeks, though they rarely last that long because they’re so addictive!
Freezing
Freezing is not recommended for Crunchy Garlic Dill Pickles, as the texture will become soggy and watery, losing the signature crunch that makes these pickles so special.
Reheating
There is no need to reheat Crunchy Garlic Dill Pickles; they are meant to be enjoyed cold or at room temperature to maintain their crispness and fresh zing.
FAQs
Can I use regular table salt instead of canning salt?
It is best to use canning salt because it dissolves more evenly and does not contain additives that can cloud the brine or affect the flavor. Regular table salt may introduce off-flavors or reduce the pickle’s crispness.
What kind of cucumbers should I choose?
Pickling cucumbers are ideal because they are smaller with thinner skins and fewer seeds, leading to crispier, less watery pickles. Avoid large slicing cucumbers or those with waxy skins for the best results.
How long should I wait before eating the pickles?
For the best flavor, wait at least two weeks to allow the garlic and dill to fully infuse into the cucumbers. Although tempting, the brine needs time to transform the cucumbers into perfect Crunchy Garlic Dill Pickles.
Can I adjust the garlic level?
Absolutely! Garlic is a personal preference. Feel free to add more or less depending on how strong you prefer your garlic flavor to be in your Crunchy Garlic Dill Pickles.
What if my jars don’t seal properly?
If you don’t hear the clicking seal sound, refrigerate those jars and consume within a week or two. For long-term storage, reprocess them by reheating and resealing, ensuring all rims and seals are clean and intact.
Final Thoughts
Making your own Crunchy Garlic Dill Pickles is incredibly rewarding and well worth the effort. They bring so much joy with their vibrant, tangy bite and satisfying crunch whether you dip, snack, or cook with them. I encourage you to dive in, experiment, and share these flavorful pickles with friends and family—you won’t regret keeping a jar or two handy in your fridge at all times!
Print
Crunchy Garlic Dill Pickles Recipe
- Total Time: 40 minutes (plus 2 weeks resting time)
- Yield: 6 pint jars 1x
- Diet: Low Fat
Description
Crunchy Garlic Dill Pickles are classic homemade pickles that combine the tangy zip of vinegar with the warmth of garlic and the aromatic bite of dill seed. These pickles boast a crisp texture and a fresh dill flavor, perfect for sandwich toppings, snacks, or adding a burst of zest to any meal. The recipe includes a straightforward canning process to preserve the pickles, ensuring a delicious, shelf-stable treat that can be enjoyed for months.
Ingredients
Brine Ingredients
- 1/2 cup canning salt
- 4 1/2 cups white vinegar
- 8 cups water
Pickling Ingredients
- 6 teaspoons minced garlic
- 5 tablespoons dill seed (not dill weed)
- 18–20 pickling cucumbers (enough to fill six pint canning jars, depending on size)
Instructions
- Preheat and Prepare Jars: Preheat your oven to 250°F (120°C). Wash canning jars in hot, soapy water to clean thoroughly. Place the clean jars upside down on a tea towel-lined baking sheet with edges and keep them hot in the oven.
- Prepare Lids and Rings: Place flat lid seals and rings in a small bowl filled with very hot water to soften the rubber seals while you prepare the cucumbers and jars.
- Prepare Cucumbers: Wash the cucumbers, slice off the stem and blossom ends of each cucumber and discard. Cut them into desired shapes, such as spears, chips, or lengthwise sandwich slices.
- Fill Jars: Carefully pack cucumber slices into the hot jars, using canning tongs to handle the jars safely. Add 1 teaspoon of minced garlic and approximately 3/4 tablespoon of dill seeds to each jar. Keep the jars hot in the oven between filling each one.
- Prepare Brine: In a large saucepan, combine vinegar, canning salt, and water. Heat the mixture to a rolling boil, stirring until the salt dissolves completely.
- Warm Lids and Rings: While the brine heats, pour almost boiling plain water (not the brine) over the lids and rings and let them soak for 5 minutes to make the seals pliable.
- Fill Jars with Brine: Remove a jar from the oven using tongs and place it on a tea towel to prevent breakage. Pour the boiling brine into the jar, leaving about 1/2 inch headspace. Remove air bubbles by sliding a plastic knife or canning tool along the sides of the jar; add more brine if necessary to cover the cucumbers fully.
- Seal Jars: Wipe the jar rims with a clean, dry towel to ensure they’re free of brine or debris. Place the warmed flat lid on the jar, then screw on the ring to finger tight. Immediately invert the jar onto the towel and let it sit for 5 minutes before turning it upright again. Listen for the ‘clicking’ sound to confirm the jars have sealed properly.
- Optional Water Bath Canning: For longer storage, after sealing, place the jars in a water bath canner and process for 15 minutes following USDA guidelines and your canner’s manufacturer instructions.
- Cool and Store: Allow jars to cool completely on the tea towel, listening for seals as they cool. Store sealed jars in a cool, dark pantry for two weeks to let the flavors mature. Once ready, refrigerate after opening and enjoy your homemade crunchy garlic dill pickles!
Notes
- Use dill seeds, not dill weed, for authentic dill flavor.
- Ensure all jars and tools are sterilized and kept hot to prevent breakage during filling.
- Always leave 1/2 inch headspace in jars when filling to allow for expansion during processing.
- Remove air bubbles carefully to avoid spoilage.
- Label jars with the packing date and the date pickles will be ready.
- If you do not water bath can, store the pickles in the refrigerator and consume within a few weeks.
- To maintain crispness, use fresh pickling cucumbers and follow recommended sterilization and cooling steps carefully.
- Prep Time: 25 minutes
- Cook Time: 15 minutes
- Category: Pickles, Preserves
- Method: Canning, Boiling, Water Bath
- Cuisine: American
Nutrition
- Serving Size: 1 pickle spear (approx. 30g)
- Calories: 10
- Sugar: 1g
- Sodium: 400mg
- Fat: 0g
- Saturated Fat: 0g
- Unsaturated Fat: 0g
- Trans Fat: 0g
- Carbohydrates: 2g
- Fiber: 1g
- Protein: 0.3g
- Cholesterol: 0mg
Keywords: garlic dill pickles, homemade pickles, pickling cucumbers, crunchy pickles, canning pickles, dill seed pickles, refrigerator pickles