
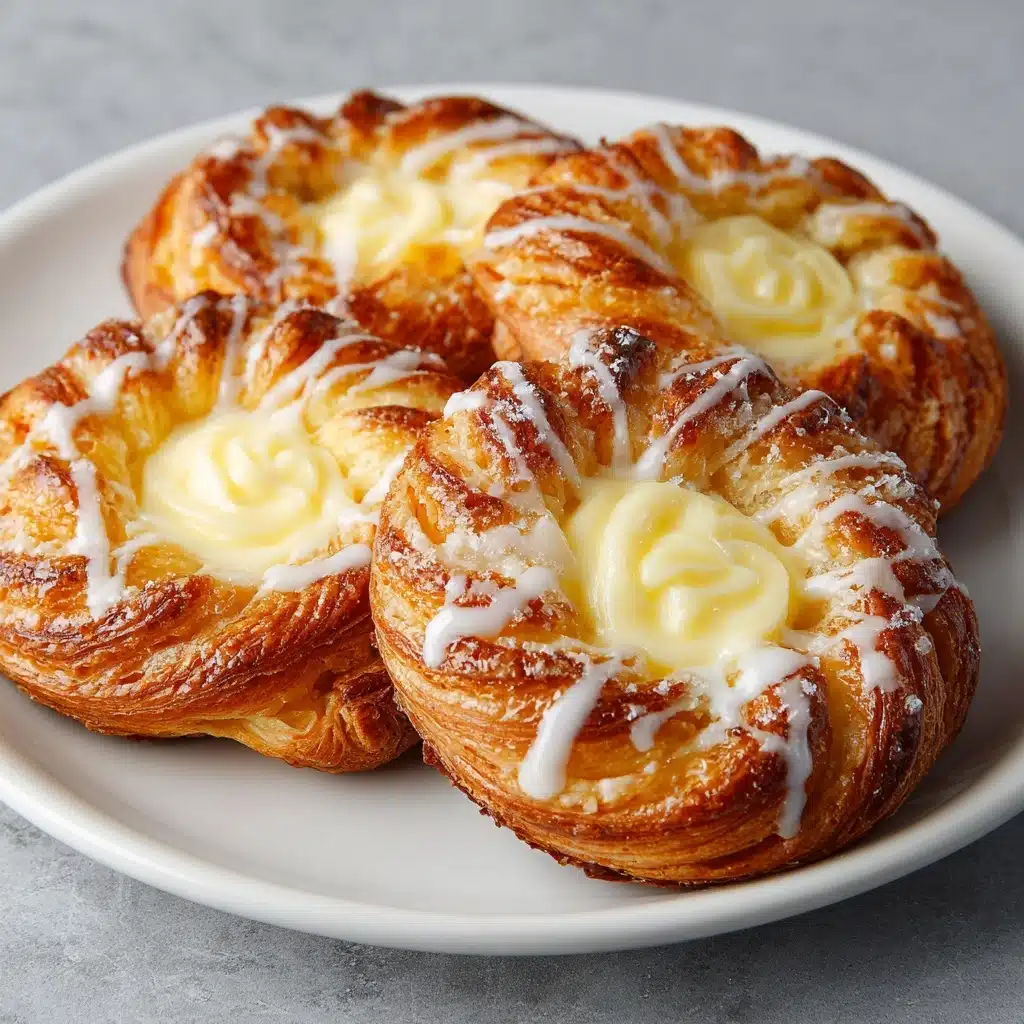
Deliciously Flaky Cheese Danish Recipe for Perfect Mornings Recipe
If you have ever wished for a bakery-style treat at home, this Deliciously Flaky Cheese Danish Recipe for Perfect Mornings is exactly what you need. Imagine biting into layers of tender, buttery dough wrapped around a luscious cream cheese filling—each bite flakier and more melt-in-your-mouth than the last. It’s the kind of recipe that transforms your kitchen into a cozy café, filling the air with irresistible aromas and making every morning feel special. Whether you’re serving a weekend brunch or just treating yourself, this Danish will quickly become a beloved staple.
Ingredients You’ll Need
To create this scrumptious Danish, we keep things wonderfully simple with a handful of essential ingredients. Each one plays a vital role: the flour and butter create that classic flaky texture, the cream cheese gives richness and tang, and the sweet glaze ties everything together with a gleam of indulgence. Let’s take a closer look at what you’ll gather for this delightful recipe.
- 4 cups (500g) all-purpose flour: The foundation of your dough, providing structure and chewiness.
- 1/3 cup (75g) granulated sugar: Adds just the right sweetness to balance the rich flavors.
- 1 tsp salt: Enhances all the flavors and keeps the dough from tasting flat.
- 1 tbsp (10g) active dry yeast: For that perfect rise and light, airy crumb.
- 1 cup (240ml) whole milk, warm: Activates the yeast and enriches the dough.
- 1 large egg, room temperature: Binds dough ingredients and adds tenderness.
- 1 cup + 2 tbsp (250g) cold unsalted butter: The magic behind the flaky layers when laminated.
- 7 oz (200g) cream cheese, softened: The creamy, tangy filling that’s simply irresistible.
- 1/4 cup (50g) granulated sugar: Sweetens the cream cheese filling softly.
- 1 tsp vanilla extract: Infuses the filling with warm, fragrant notes.
- Zest of 1 lemon (optional): Adds a fresh citrusy brightness that lifts the flavors.
- 1 cup (100g) powdered sugar: For the glaze that adds a sweet finishing touch.
- 1–2 tbsp milk or lemon juice: Adjusts the glaze consistency and adds subtle flavor.
- 1/2 tsp vanilla extract: Makes the glaze fragrant and smooth.
- Optional toppings like fruit preserves, fresh berries, or sliced almonds: To decorate and add an extra pop of color and texture.
How to Make Deliciously Flaky Cheese Danish Recipe for Perfect Mornings
Step 1: Make the Dough
Begin by combining your dry ingredients—flour, sugar, and salt—in a large bowl. In a small separate bowl, stir together warm milk and active dry yeast, then let it sit for 5–10 minutes until it becomes pleasantly foamy. This indicates your yeast is alive and kicking. Add the beaten egg and yeast mixture to your dry ingredients and knead until the dough turns smooth and elastic, about 6 to 8 minutes. Don’t rush this step; developing that gluten is key for a great texture. Once done, cover the dough and pop it in the fridge for a 30-minute chill—it relaxes the dough and makes laminating much easier.
Step 2: Prepare Butter Block
Next, prepare the star ingredient for those flaky layers: the butter block. Place the cold unsalted butter between parchment paper sheets and pound it firmly into an 8-inch square. This shape and firmness are perfect for the upcoming folding process. Chill the block until it’s firm but still pliable; this ensures the butter layers won’t blend into the dough prematurely.
Step 3: Laminate the Dough
Now the fun of laminating starts. Roll your chilled dough into a 16-inch square on a lightly floured surface. Place the butter block in the center at a 45-degree angle, like a diamond. Fold each corner of the dough over the butter to seal it completely inside. Roll this package out into an 8 by 24-inch rectangle, then fold it into thirds like a letter. This process of rolling and folding creates the multiple buttery layers that will puff beautifully in the oven. Chill for 30 minutes, and then repeat the rolling, folding, and chilling two more times. It’s a bit of work, but trust me—it’s so worth it.
Step 4: Shape the Danish
After those layers have rested enough, roll your dough out to about 1/4-inch thickness. Cut the dough into neat 4-inch squares and add about a tablespoon of your luscious cream cheese filling right in the center. You can fold the corners in, twist the edges, or even braid the dough—don’t hesitate to get creative with the shapes. If you want an extra touch, place fresh berries or a dollop of fruit jam on top before baking. These little details make the Danish feel extra special and irresistible.
Step 5: Proof and Bake
Arrange your prepared Danish pastries on baking sheets lined with parchment paper. Let them rise at room temperature for about an hour—this proofing step allows the dough to puff up delightfully. Meanwhile, preheat your oven to a toasty 390°F (200°C). Just before baking, brush each Danish with an egg wash or milk to give them that golden, glistening finish. Pop them into the oven and bake for 15 to 20 minutes, until they turn that perfect golden brown that makes your mouth water instantly.
Step 6: Glaze and Serve
Once out of the oven, let your Danish cool completely so the glaze won’t melt away. Mix powdered sugar with milk or lemon juice and vanilla extract until you have a smooth, drizzle-able glaze. Drizzle it generously over each Danish and watch them transform into irresistible little works of art. Now, it’s time to indulge in your own homemade delight!
How to Serve Deliciously Flaky Cheese Danish Recipe for Perfect Mornings

Garnishes
A simple glaze is wonderful, but why not elevate your Danish with eye-catching garnishes? Fresh berries add a burst of juicy sweetness and vibrant color that beautifully contrasts with the creamy filling. A sprinkle of sliced almonds provides delightful crunch and a nutty aroma that complements the richness. Or spread a thin layer of your favorite fruit preserves before baking for an extra tangy twist. These touches make your presentation look as good as your Danish tastes.
Side Dishes
Though perfect on its own with a cup of coffee or tea, you can turn your morning treat into a full brunch experience. Serve alongside fresh fruit salad for bursts of freshness or pair it with savory scrambled eggs to balance the sweet indulgence. A dollop of yogurt with honey and nuts on the side also makes a wonderful healthy contrast. The versatility of this Danish makes it easy to customize any meal.
Creative Ways to Present
Bring a bit of fun to your serving style by arranging a Danish platter with mini pastries of different shapes assembled from the same dough. Wrap individual Danishes in decorative parchment and tie with a ribbon for gifting or party favors. You could also create a Danish brunch board with various toppings—glaze, jams, cream, and fresh fruit—so everyone can customize their own flaky creation. Presentation is part of the joy, and this Deliciously Flaky Cheese Danish Recipe for Perfect Mornings invites playful creativity.
Make Ahead and Storage
Storing Leftovers
Freshly baked Danish pastries are best eaten the same day, but leftovers can be safely stored. Place them in an airtight container at room temperature for up to two days. Avoid the fridge if you want to keep the pastry from becoming too dense, as refrigeration can dry out the delicate layers.
Freezing
If you want to enjoy your Danish later, the dough or fully baked pastries can be frozen. Wrap individual unbaked Danishes well in plastic wrap and freeze for up to one month. When ready, thaw gently overnight in the fridge and bake fresh as per the recipe. Alternatively, freeze cooled baked Danishes in airtight containers and reheat before serving for that just-baked feel.
Reheating
To revive the flaky texture and warm filling, reheat Danish pastries in a 350°F (175°C) oven for 5–7 minutes. This method crisps the layers back to life far better than a microwave, which can make the dough soggy. Sprinkle a little extra powdered sugar after reheating for a fresh glaze effect.
FAQs
Can I use store-bought puff pastry instead of making the dough?
Absolutely! While fresh dough adds a wonderful homemade touch, using high-quality store-bought puff pastry can save time and still yield delicious results. Just adjust baking times as needed and proceed with the cream cheese filling and shaping.
Is it necessary to chill the dough between folds?
Yes, chilling between folds is critical to keep the butter from melting into the dough. This process creates the many layers that puff up in the oven and make the Danish so flaky. Skipping this step can result in a denser pastry.
Can I substitute cream cheese filling with something else?
You can experiment with ricotta or mascarpone for a different creamy texture, or even almond paste for a nutty flavor. Just keep the consistency thick enough to hold its shape inside the pastry and maintain balance with the sweet dough.
How long does it take to make this recipe from start to finish?
Including chilling and proofing time, expect about 3 to 4 hours overall. Most of that is hands-off time while the dough rests, so you can relax or prepare other meal components during those intervals.
Can this recipe be made vegan?
For a vegan version, swap the butter for a plant-based alternative, use almond or soy milk instead of dairy milk, and find a vegan cream cheese substitute. The yeast dough technique remains the same, though the texture might vary slightly.
Final Thoughts
Making this Deliciously Flaky Cheese Danish Recipe for Perfect Mornings at home is such a rewarding experience. It combines the timeless charm of classic pastries with the comfort of homemade goodness, ensuring your mornings start on a truly delicious note. Give it a try—you’ll find it’s not only a treat for your taste buds but also a joyful baking adventure that turns everyday moments into celebrations.
Print
Deliciously Flaky Cheese Danish Recipe for Perfect Mornings Recipe
- Total Time: 1 hour 50 minutes
- Yield: 12 Danishes 1x
- Diet: Vegetarian
Description
This Deliciously Flaky Cheese Danish Recipe is perfect for creating elegant, buttery pastries that start your mornings right. Featuring a tender, laminated dough filled with a creamy, tangy cream cheese filling, these Danishes are topped with a sweet vanilla glaze, optionally enhanced with fresh berries or fruit preserves. Ideal for breakfast, brunch, or a special treat, this recipe breaks down the lamination process for flaky layers and a rich, satisfying flavor.
Ingredients
For the Dough:
- 4 cups (500g) all-purpose flour
- 1/3 cup (75g) granulated sugar
- 1 tsp salt
- 1 tbsp (10g) active dry yeast
- 1 cup (240ml) whole milk, warm
- 1 large egg, room temperature
- 1 cup + 2 tbsp (250g) cold unsalted butter, for laminating
For the Cream Cheese Filling:
- 7 oz (200g) cream cheese, softened
- 1/4 cup (50g) granulated sugar
- 1 tsp vanilla extract
- Zest of 1 lemon (optional)
For the Glaze:
- 1 cup (100g) powdered sugar
- 1–2 tbsp milk or lemon juice
- 1/2 tsp vanilla extract
Optional Toppings:
- Fruit preserves
- Fresh berries
- Sliced almonds
Instructions
- Make the Dough: In a large bowl, whisk together the flour, sugar, and salt. In a separate small bowl, combine the warm milk and active dry yeast, letting it sit for 5 to 10 minutes until the mixture becomes foamy. Add the egg and yeast mixture to the dry ingredients, then mix and knead the dough on a lightly floured surface for about 6 to 8 minutes until smooth and elastic. Cover the dough with plastic wrap and chill it in the refrigerator for 30 minutes.
- Prepare Butter Block: Place the cold unsalted butter between two sheets of parchment paper. Using a rolling pin or a heavy pan, gently pound and shape the butter into an 8-inch square. Chill the butter block in the refrigerator until firm but still pliable, about 15 to 20 minutes.
- Laminate the Dough: Roll the chilled dough out on a lightly floured surface into a 16-inch square. Place the prepared butter block diagonally in the center of the dough, forming a diamond shape. Fold the dough corners over the butter to fully encase it. Roll this packet into a long, thin rectangle approximately 8 by 24 inches. Fold the rectangle into thirds like a business letter. Wrap the dough in plastic and chill for 30 minutes. Repeat this rolling and folding process two more times, chilling for 30 minutes between each to create distinct flaky layers.
- Shape the Danish: After the final chilling, roll the dough out to about 1/4-inch thickness. Cut the dough into 4-inch squares. Spoon about one tablespoon of the cream cheese filling into the center of each square. Fold the corners toward the center or shape the dough as desired to create a Danish shape. Add optional fresh berries or a dollop of fruit preserves on top if using.
- Proof and Bake: Place the shaped Danishes on parchment-lined baking sheets. Allow them to rise at room temperature for about 1 hour or until puffed. Meanwhile, preheat the oven to 390°F (200°C). Optionally brush the Danishes lightly with egg wash or milk for a golden crust. Bake in the preheated oven for 15 to 20 minutes or until they turn golden brown and flaky.
- Glaze and Serve: Remove the Danishes from the oven and let them cool completely on a wire rack. Prepare the glaze by mixing powdered sugar with 1 to 2 tablespoons of milk or lemon juice and vanilla extract until smooth. Drizzle the glaze generously over the cooled Danishes before serving.
Notes
- Keep the butter and dough cold throughout the lamination process to ensure flaky layers.
- The lemon zest in the filling adds a fresh bright flavor but can be omitted if preferred.
- Use room temperature egg for better dough incorporation.
- For a dairy-free version, substitute cream cheese and milk with suitable vegan alternatives.
- Store leftover Danishes in an airtight container for up to 2 days; reheat gently before serving.
- Feel free to experiment with different fillings such as fruit jams or almond paste.
- Prep Time: 1 hour 30 minutes
- Cook Time: 15-20 minutes
- Category: Breakfast, Pastry, Dessert
- Method: Laminating, Baking
- Cuisine: American, Danish-inspired
Nutrition
- Serving Size: 1 Danish
- Calories: 350 kcal
- Sugar: 15 g
- Sodium: 230 mg
- Fat: 22 g
- Saturated Fat: 13 g
- Unsaturated Fat: 7 g
- Trans Fat: 0.5 g
- Carbohydrates: 30 g
- Fiber: 1 g
- Protein: 6 g
- Cholesterol: 65 mg
Keywords: Cheese Danish, laminated pastry, creamy filling, breakfast recipe, flaky pastry, cream cheese danish


