
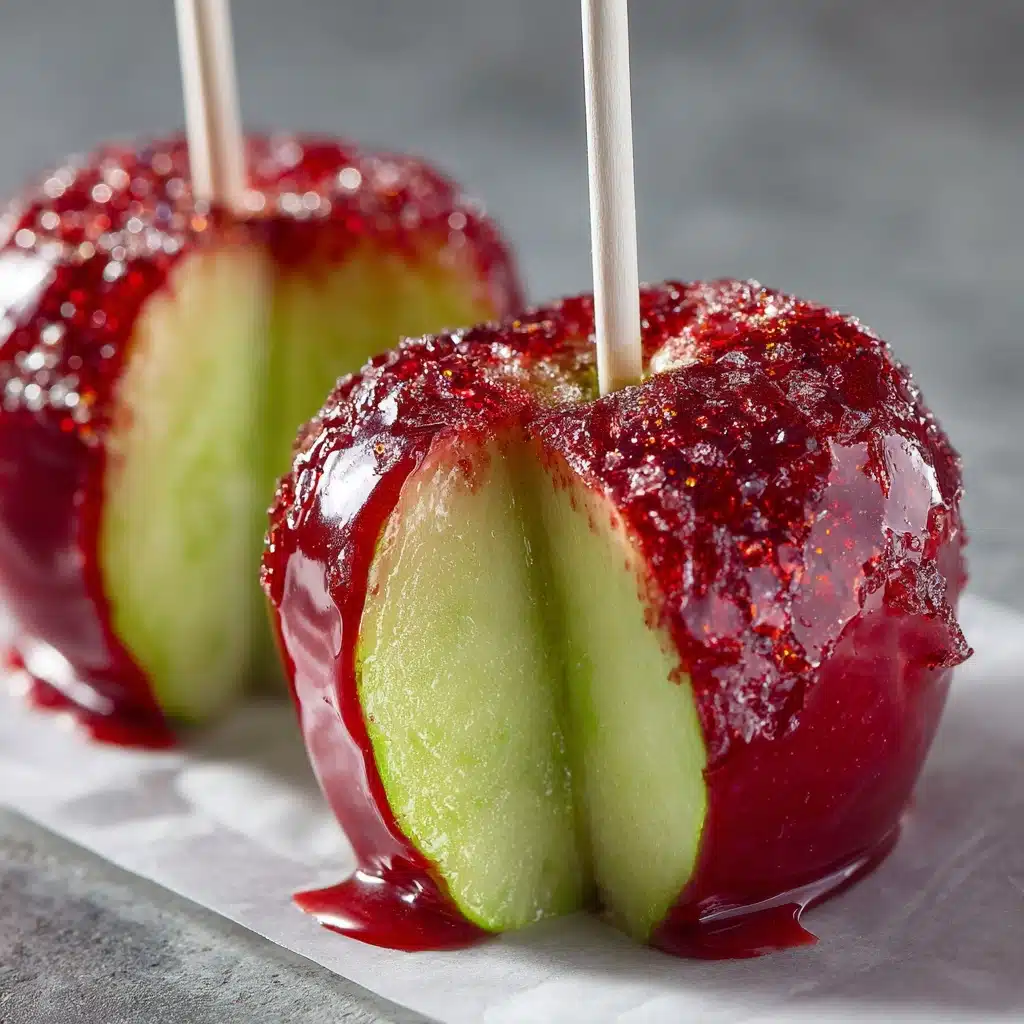
Easy Homemade Candy Apples Recipe
If you have a sweet tooth and love a nostalgic treat that packs a crunchy, glossy punch, then you absolutely must try these Easy Homemade Candy Apples. They’re a timeless delight that showcase crisp apples encased in a vibrant, shiny candy shell that cracks just perfectly with every bite. Whether you’re gearing up for a festive gathering or just craving something special at home, these candy apples deliver that perfect balance of tart and sweet with a beautiful, glass-like finish that you can feel proud to make yourself. Plus, they’re simpler to whip up than you’d think!
Ingredients You’ll Need
Getting the ingredients together for your Easy Homemade Candy Apples is refreshingly straightforward. Each component plays a crucial role in creating the perfect candy shell and juicy apple center you’ll savor bite after bite.
- 12 small red or green apples: Choose apples that are firm and fresh to keep that crisp texture behind the candy coating.
- 12 lollipop or popsicle sticks: These will act as sturdy handles so you can enjoy your candy apples mess-free.
- 3 cups sugar: The sweetness base that hardens into that iconic glassy shell.
- 1/2 cup light corn syrup: Prevents crystallization, keeping your candy coating smooth and glossy.
- 1 cup water: Helps dissolve the sugar and controls the candy’s texture during cooking.
- 1/2 teaspoon red food coloring: For that classic, eye-popping candy apple look, but feel free to adjust the amount to get the shade just right.
- Candy thermometer: Essential for ensuring your candy mixture hits the perfect hard crack stage for crunchiness.
How to Make Easy Homemade Candy Apples
Step 1: Prep Your Apples and Sticks
Start with washing your apples thoroughly to remove any waxy coating, which can prevent the candy from sticking properly. A quick dip in boiling water with a splash of vinegar followed by drying does the trick wonderfully. Then, firmly insert the lollipop sticks into the stem end of each apple, giving you the perfect grip to dip and enjoy.
Step 2: Cook the Candy Mixture
In a heavy-bottomed saucepan, combine the sugar, light corn syrup, and water. Bring it to a boil over medium heat and monitor closely with your candy thermometer. Cook until the mixture reaches 300ºF, which is the hard crack stage—this ensures the candy will harden perfectly around your apples for that signature crunch.
Step 3: Color and Safely Stir the Candy
Remove the pan from heat and carefully stir in the red food coloring. Be cautious as the hot candy can splash. This step not only adds that festive red hue but also boosts the candy’s appeal to your tastes and eye. Depending on your food coloring, you might want to add a bit more to deepen the color, so trust your instincts!
Step 4: Dip Your Apples
One by one, dip each apple into the hot candy mixture, swirling gently to coat evenly. Allow any excess to drip back into the pan before placing the coated apple on a wax paper-lined cookie sheet sprayed with cooking oil. This setup helps the candy apples cool and harden without sticking to surfaces.
Step 5: Let Them Cool Until Set
Allow the candy-coated apples to rest at room temperature until the candy shell is fully hardened, which usually takes about 30 minutes. The wait is worth it for that perfect, crackly shell surrounding each juicy apple.
How to Serve Easy Homemade Candy Apples
Garnishes
Sprinkle chopped nuts, crushed candy cane pieces, or colorful sprinkles on the wet candy before it sets for an extra festive twist. A dusting of edible glitter or drizzled chocolate can also make your candy apples pop at any party.
Side Dishes
Easy Homemade Candy Apples pair marvelously with warm spiced cider or a cup of rich hot chocolate. These sides complement the crisp, caramelized flavor with cozy warmth, especially on chilly fall days or during festive gatherings.
Creative Ways to Present
Serve your candy apples nestled in colorful cupcake liners or stuck upright in a foam block decorated with autumn leaves and miniature pumpkins for eye-catching party displays. Wrapping them in clear cellophane with a bright ribbon makes for delightful giveaways or charming gifts.
Make Ahead and Storage
Storing Leftovers
If you find yourself lucky enough to have leftovers, store candy apples in a cool, dry place away from sunlight to keep the candy shell crisp. Avoid refrigeration as humidity can soften the candy coating and make it sticky.
Freezing
Freezing candy apples isn’t recommended since the moisture can affect the texture dramatically, leading to soggy spots when thawed. It’s best to enjoy them fresh within a couple of days for optimal crunch and flavor.
Reheating
Reheating candy apples isn’t practical because the candy shell is meant to stay hard. However, if the candy coating hardens too quickly during dipping, simply warming the mixture gently again will help continue dipping smoothly without compromising the crackle.
FAQs
Can I use different types of apples for this recipe?
Absolutely! While tart apples like Granny Smith work great for balancing the sweet candy shell, feel free to experiment with your favorites. Just pick apples that are firm and fresh for the best texture.
What if I don’t have corn syrup on hand?
Corn syrup prevents crystallization and keeps the candy smooth, but if you don’t have it, you can substitute with an equal amount of light golden syrup or honey. Be prepared for a slightly different texture or color.
How can I make the candy coating less sticky?
Ensuring your apples are wax-free and dryness is key. Additionally, letting the candy cool at room temperature without disturbance helps it harden fully, resulting in a non-sticky finish.
Can I use other food coloring colors?
Definitely! While red is classic, you can go wild with orange, green, or even multi-colored candy coatings to suit different occasions or your personal flair.
What do I do if the candy mixture starts to harden before I finish dipping?
Simply reheat the saucepan gently over medium heat to melt it back to the perfect dipping consistency and continue coating your apples.
Final Thoughts
Making Easy Homemade Candy Apples is such a joyful culinary adventure that brings a bit of magic to any season. From the crackle of the candy shell to the crisp bite of fresh apples, it’s a treat that never goes out of style. I encourage you to give this recipe a try—you might just find yourself hooked and sharing these beauties with friends and family all year round!
Print
Easy Homemade Candy Apples Recipe
- Total Time: 30 minutes
- Yield: 12 candy apples 1x
- Diet: Vegetarian
Description
This easy homemade candy apples recipe transforms crisp, fresh apples into a delightful treat coated with a shiny, hard candy shell. Perfect for Halloween parties or festive occasions, these classic candy apples combine tangy fruit with a sweet, crunchy exterior made from a simple sugar syrup cooked to the hard crack stage and colored vibrant red. With straightforward ingredients and step-by-step instructions, making candy apples at home has never been simpler or more fun.
Ingredients
Apples
- 12 small red or green apples (any variety)
- 12 lollipop or popsicle sticks
Candy Coating
- 3 cups sugar
- 1/2 cup light corn syrup
- 1 cup water
- 1/2 teaspoon red food coloring
Instructions
- Prepare Apples: Wash and thoroughly dry the apples to ensure the candy coating will stick properly. Insert the lollipop or popsicle sticks firmly into the apples. Place the apples on a cookie sheet lined with wax paper coated with cooking spray.
- Make Candy Syrup: In a heavy-bottomed saucepan over medium heat, combine sugar, corn syrup, and water. Bring the mixture to a boil and continue cooking until a candy thermometer registers 300ºF (hard crack stage).
- Add Food Coloring: Remove the saucepan from heat. Carefully stir in the red food coloring, adding a bit more if needed for a vibrant color, but be cautious of splashes.
- Dip Apples: One at a time, dip each apple into the candy mixture, swirling to coat evenly. Allow excess syrup to drip back into the pan, then place the coated apple back onto the prepared cookie sheet to cool and harden.
- Remove Wax Coating (Optional): To help candy stick better, remove any wax on apples by boiling 6 cups of water with 1 tablespoon of white vinegar. Quickly dip apples for 5 seconds and dry thoroughly before coating.
- Reheat Candy if Needed: If the candy mixture hardens while coating apples, simply reheat it gently over medium heat to return it to proper consistency.
- Serve: Once cooled and hardened, serve the candy apples, optionally placing them in colorful cupcake wrappers for a festive presentation.
Notes
- Removing the wax coating on apples helps the candy adhere better. Use the vinegar-water dip method described.
- If the candy mixture hardens during the dipping process, reheat gently to soften and continue coating.
- Using a candy thermometer is important for achieving the correct temperature and texture of the candy coating.
- Serving within cupcake wrappers adds a fun and festive touch to your presentation.
- Be careful when working with hot sugar syrup to avoid burns.
- Prep Time: 15 minutes
- Cook Time: 15 minutes
- Category: Dessert, Snack
- Method: Candy making, dipping
- Cuisine: American
Nutrition
- Serving Size: 1 candy apple
- Calories: 250 kcal
- Sugar: 50 g
- Sodium: 10 mg
- Fat: 0 g
- Saturated Fat: 0 g
- Unsaturated Fat: 0 g
- Trans Fat: 0 g
- Carbohydrates: 66 g
- Fiber: 2 g
- Protein: 0.5 g
- Cholesterol: 0 mg
Keywords: candy apples, homemade candy apples, Halloween candy, candy-coated apples, red candy apples, easy candy apples recipe


