
French Crullers Recipe
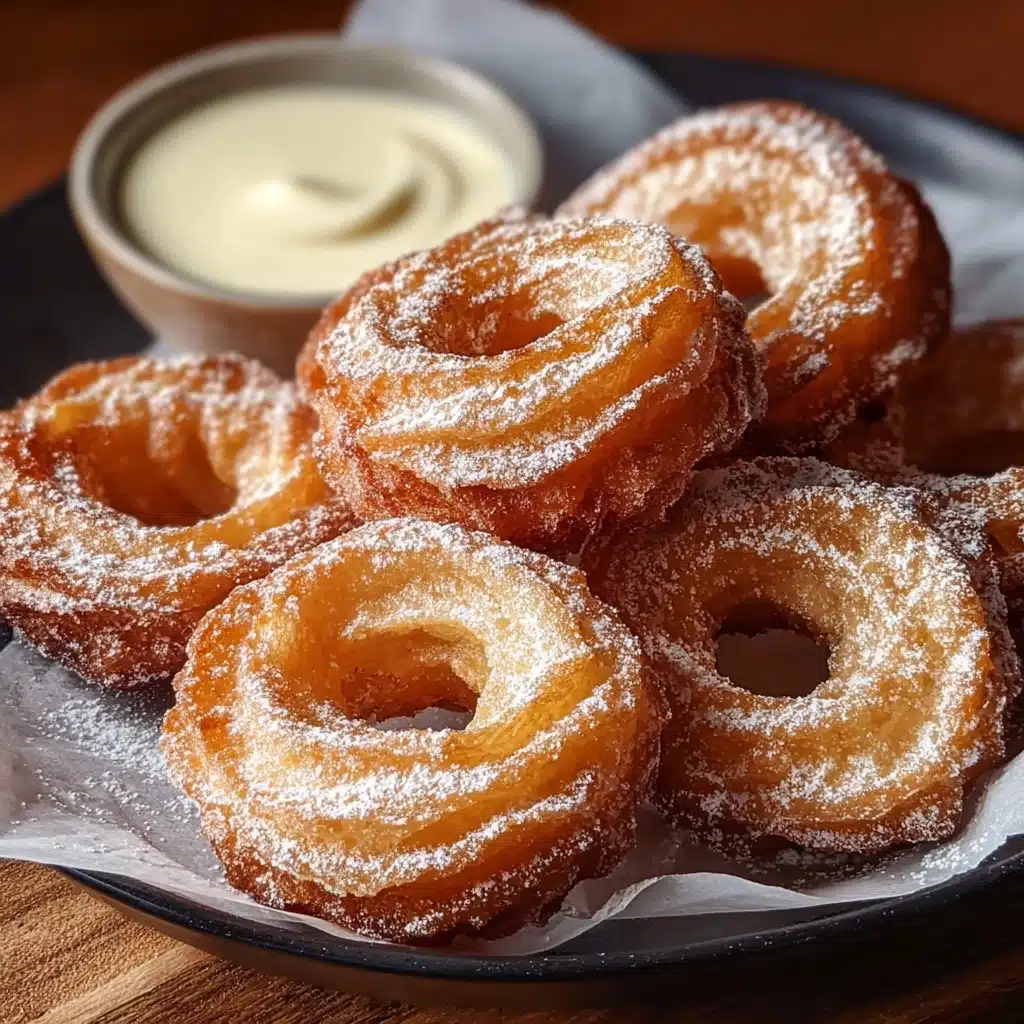
There’s something utterly magical about French Crullers — those beautifully light, golden pastries with irresistibly crisp ridges and a delicate, airy interior. Each bite offers that signature melt-in-your-mouth texture and a sweet, glossy finish from a simple glaze. If you’ve only ever had them from your favorite bakery, you’re in for a treat: making French Crullers at home transforms your kitchen into a Parisian patisserie, with the enchanting aroma of warm dough and vanilla wafting through the air. Trust me, baking these at home is much easier than it looks, and every step is pure joy for any pastry lover.

Ingredients You’ll Need
The secret to perfect French Crullers lies in their simple ingredient list. Each element brings something unique to the table, contributing to the crullers’ signature puff, lightness, and gently sweet flavor. Here’s what you’ll need:
- All-purpose flour: This adds essential structure, giving the dough its body and that soft chew once fried.
- Unsalted butter: Rich flavor and a luxurious mouthfeel start right here.
- Eggs: These are the cruller’s secret to puff and airy texture, helping them rise beautifully during frying.
- Granulated sugar: Just enough to sweeten and create balance in the dough.
- Vanilla extract: It infuses the pastries with a lovely aroma and depth of flavor.
- Baking powder: Adds extra lift for a wonderfully light and fluffy finish that’s classic in French Crullers.
- Salt: A pinch sharpens all the sweet notes and balances the flavors perfectly.
- Powdered sugar: This makes the glaze that’s iconic for French Crullers—silky and smooth, clinging to every crevice.
- Milk: A splash creates a lush, pourable glaze for the perfect finishing touch.
How to Make French Crullers
Step 1: Begin the Dough Base
Start by setting a medium saucepan over low heat. Melt the unsalted butter together with water, a pinch of salt, and half a cup of granulated sugar. Stir occasionally, allowing the butter to fully melt and the sugar to dissolve. As the mixture warms, the kitchen should already begin smelling like your favorite bakery. Once the mixture comes to a gentle boil, you’re ready to move on.
Step 2: Add the Flour
With your melted mixture bubbling gently, add the cup of all-purpose flour all at once. Grab a wooden spoon and stir vigorously. The mixture will quickly come together into a glossy, smooth ball. It should pull away cleanly from the sides of the pan—a telltale sign the dough is coming together just right. This classic pâte à choux method will help guarantee your French Crullers get that signature airy texture inside.
Step 3: Cool and Add Eggs
Take a moment to let the dough cool off slightly; you don’t want to scramble the eggs, after all! Once it isn’t piping hot, mix in the eggs one at a time. Each egg needs to be fully incorporated before adding the next. The dough will look a little lumpy at first, but keep going. When all four eggs are mixed in, you’ll have a batter that’s smooth, shiny, and just a little sticky. This is exactly what you want for perfect French Crullers.
Step 4: Pipe the Crullers
Fit a piping bag with a large star tip and fill it with your dough. Pipe long strips or traditional ring shapes onto baking sheets lined with parchment paper. If you want that iconic cruller look, pipe them about 4-5 inches long or in circles. Leaving a little space between each means they’ll puff up without sticking together during frying.
Step 5: Fry Them to Golden Perfection
Pour oil into a deep pot and heat it to 350°F (175°C). Test with a small piece of dough: it should sizzle and start to puff. Fry each cruller for about three minutes per side, turning with care for an even, golden crust. Watch as the ridges crisp and the inside puffs up beautifully! Drain the French Crullers on a wire rack or paper towel to catch excess oil.
Step 6: Glaze Effortlessly
To finish, whisk your powdered sugar and milk together until a smooth glaze forms. Dip each warm cruller into the glaze, making sure to coat both sides for maximum shine and flavor. Let any extra drip off before placing the crullers back on the rack to set slightly. The result: glossy, sweet, bakery-worthy French Crullers you’ll want to devour instantly.
How to Serve French Crullers
Garnishes
While classic glazed French Crullers are lovely on their own, a pinch of flair never hurts. Try a dusting of powdered sugar, a sprinkle of finely chopped nuts, or a drizzle of dark chocolate. Citrus zest or a touch of cinnamon in the glaze can add an unexpected, delightful twist. These garnishes not only look pretty but also offer a fun pop of extra flavor.
Side Dishes
Pair your crullers with something to sip — a creamy coffee, rich café au lait, or a mug of hot chocolate is a must for the full French pastry experience. For something a bit lighter, a bowl of fresh berries or fruit salad will balance the cruller’s sweet richness. You could even serve them with a dollop of whipped cream for special occasions.
Creative Ways to Present
Don’t be shy—pile your French Crullers high on a cake stand and let them take center stage at brunch or dessert. You could even turn them into a cruller “tower” by stacking them into a playful pyramid. For an elegant touch, serve each cruller on its own small plate with a swirl of extra glaze or a sprig of mint. They’re showstoppers however you arrange them.
Make Ahead and Storage
Storing Leftovers
If you have leftover French Crullers (though I doubt they’ll last long!), keep them loosely covered at room temperature for up to one day. An airtight container can trap excess moisture, softening the glaze, so a paper towel-lined plate with a loose cover works best. The texture is always at its peak the day they’re made, but they’re still delicious for a short while after.
Freezing
Want to make a batch ahead? Un-glazed French Crullers freeze quite well! Once cooled, layer them between pieces of parchment in a freezer-safe container. They’ll keep their lovely texture for up to a month. Just thaw at room temperature and glaze fresh before serving for best results.
Reheating
To revive leftover or thawed French Crullers, simply pop them in a 300°F (150°C) oven for a few minutes. This brings back the lightness and crunch without drying them out. Add the glaze after reheating and they’ll taste just-baked again.
FAQs
What makes French Crullers different from other doughnuts?
French Crullers stand apart thanks to their pâte à choux base, which gives a uniquely light, airy texture compared to classic yeast or cake doughnuts. The ridged shape creates more surface area for that irresistible glaze and crispiness!
Can I bake French Crullers instead of frying them?
While traditional crullers are fried for that classic crunch, you can bake them at 400°F (200°C) for about 20-25 minutes until golden. The result will be slightly less crispy but still deliciously light. Give the baked version a try if you prefer less oil.
Do I need a piping bag and star tip?
For the signature ridged look and fluffy shape of French Crullers, a piping bag with a large star tip is ideal. If you don’t have one, try snipping the corner off a sturdy plastic bag — your crullers won’t have the classic design, but they’ll still taste amazing!
Why did my crullers deflate after frying?
This often happens if the dough was under-mixed, the oil wasn’t hot enough, or the crullers were removed before being fully cooked and set. Make sure to let them fry until deeply golden and test the oil temperature for best results.
What’s the best way to keep the glaze from getting soggy?
Allow the excess glaze to drip off onto a rack and make sure your crullers are still just a bit warm (not hot) before dipping. Let them set in a single layer so they don’t touch. This keeps the glossy coating beautiful and helps maintain their light texture.
Final Thoughts
I truly hope you’ll give homemade French Crullers a try — there’s a special delight in frying your own, glazing them fresh, and sharing these golden beauties with friends or family. They’re surprisingly fun to make and always disappear quickly, so don’t be afraid to double the batch. Happy baking!
Print
French Crullers Recipe
- Total Time: 35 minutes
- Yield: 12 crullers 1x
- Diet: Vegetarian
Description
These French Crullers are a delightful, airy twist on traditional doughnuts. Light and fluffy on the inside with a crispy, golden exterior, these sweet treats are perfect for breakfast or dessert.
Ingredients
Dough:
- 1 cup all-purpose flour
- 1/2 cup unsalted butter
- 4 large eggs
- 1/2 cup granulated sugar
- 1 tsp vanilla extract
- 1 tsp baking powder
- 1/4 tsp salt
Glaze:
- 2 cups powdered sugar
- 1/4 cup milk
Instructions
- Making the Dough: In a saucepan over low heat, melt butter with water, salt, and sugar until combined. Bring to a gentle boil.
- Forming the Dough: Add flour all at once and stir vigorously until it forms a smooth ball of dough.
- Adding Eggs: Allow to cool slightly, then mix in eggs one at a time until the dough is smooth and slightly sticky.
- Piping the Dough: Pipe long strips onto parchment-lined baking sheets.
- Frying: Heat oil in a deep pot to 350°F (175°C). Fry crullers for about three minutes on each side until golden brown.
- Glazing: Whisk powdered sugar with milk for the glaze; dip warm crullers into the glaze and let excess drip off.
- Prep Time: 20 minutes
- Cook Time: 15 minutes
- Category: Dessert
- Method: Frying
- Cuisine: French
Nutrition
- Serving Size: 1 cruller
- Calories: 220
- Sugar: 15g
- Sodium: 90mg
- Fat: 9g
- Saturated Fat: 5g
- Unsaturated Fat: 3g
- Trans Fat: 0g
- Carbohydrates: 32g
- Fiber: 0.5g
- Protein: 3g
- Cholesterol: 70mg
Keywords: French Crullers, Doughnuts, Breakfast, Dessert, Sweet Treats

