
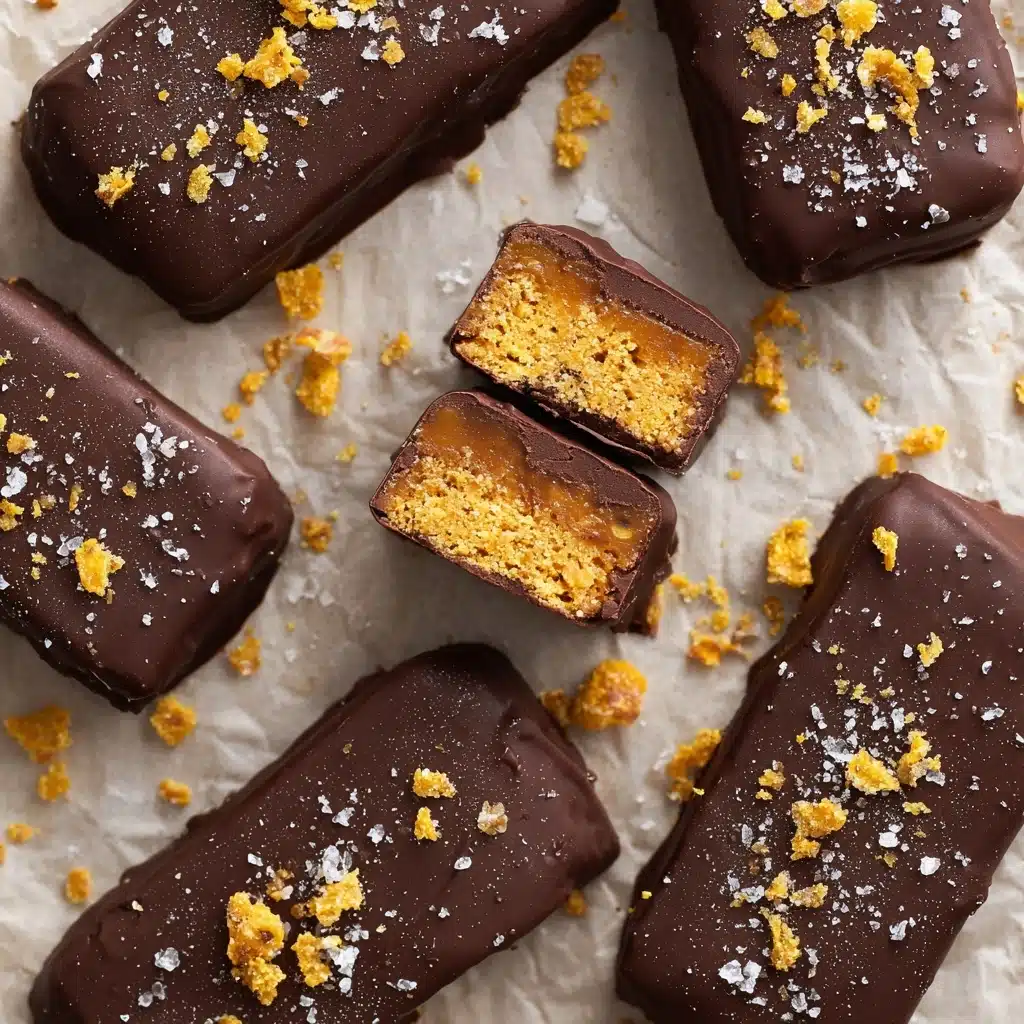
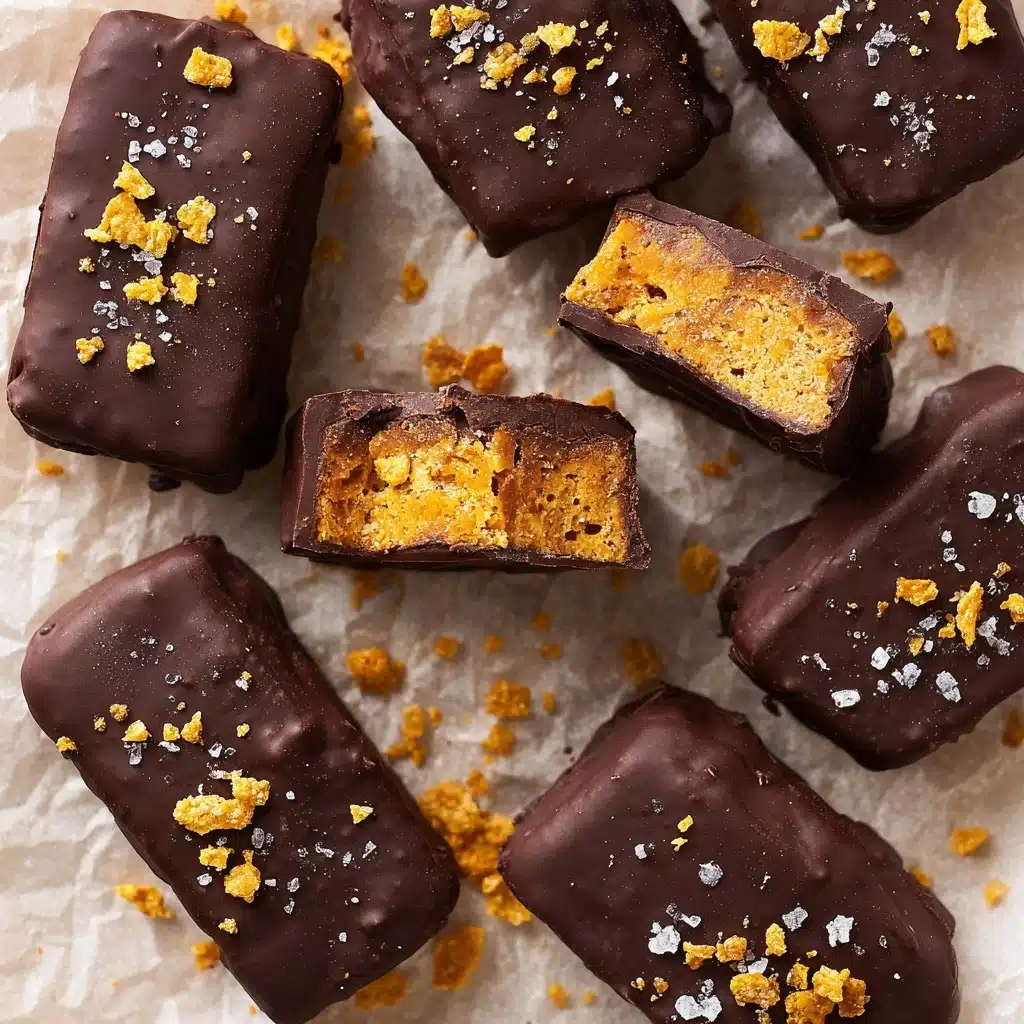
Healthy Homemade Butterfingers Recipe
If you’ve been craving a sweet treat that hits all the right notes without the guilt, then you’re absolutely going to love these Healthy Homemade Butterfingers. This recipe turns the classic candy bar into a wholesome, crunchy delight using simple ingredients like peanut butter, corn flakes, and real maple syrup. It’s one of those snack-time wonders that feels indulgent and nourishing all at once, making it perfect for satisfying your sweet tooth while staying on track with your health goals. Plus, making them at home lets you control the quality of every ingredient, ensuring you’re enjoying the tastiest and healthiest Butterfingers ever!
Ingredients You’ll Need
The magic of Healthy Homemade Butterfingers lies in a handful of straightforward ingredients that come together beautifully. Each component plays a key role, whether it’s building texture, flavor, or that gorgeous golden look we all love.
- 1 cup peanut butter: Use natural, creamy peanut butter for a rich, nutty base that adds protein and depth.
- 1/3 cup maple syrup or honey: This natural sweetener binds everything and brings just the right hint of sweetness without refined sugars.
- 2 cups corn flakes: Crispy and light, corn flakes provide the satisfying crunch and classic candy bar texture.
- 1 cup chocolate chips: Choose your favorite dark or semi-sweet chocolate for coating, which adds that luscious finishing touch.
- 2 teaspoons coconut oil: Helps melt the chocolate smoothly and ensures a glossy, even coating on each bar.
How to Make Healthy Homemade Butterfingers
Step 1: Prep the Corn Flakes
Grab a large zip-top bag and pour in the corn flakes. Seal the bag tightly and crush the cereal gently with your hands or a rolling pin until you have small, bite-sized pieces. This step is all about creating that signature crunchy texture while making sure the flakes mix evenly with the peanut butter. Crunchy without being overpowering is the sweet spot here!
Step 2: Combine Peanut Butter and Sweetener
In a large mixing bowl, add the peanut butter and your choice of maple syrup or honey. Stir them together until smooth and fully combined—this forms the gooey, slightly sticky glue that holds your bars together. The natural sweetness from these two ingredients balances perfectly against the crunchy corn flakes, making every bite a joy.
Step 3: Mix in the Crushed Corn Flakes
Now, pour the crushed corn flakes into the peanut butter mixture. Fold everything together gently but thoroughly, ensuring each flake is coated and ready to pack into the pan. This combination is the heart of your Healthy Homemade Butterfingers—crunchy and chewy all at once.
Step 4: Press and Chill
Line a loaf pan with parchment paper for easy removal, then transfer the mixture into the pan. Press it down firmly and evenly so your bars hold their shape once chilled. Pop the pan in the freezer for at least one hour; this sets everything up perfectly for cutting without losing that classic buttery snap.
Step 5: Cut into Bars
Once your mixture has hardened, lift it out using the parchment paper and place it on a cutting board. Slice into 12 equally sized bars. This is the exciting moment where your homemade candy starts to look just like the real deal—crispy, buttery, and utterly tempting.
Step 6: Coat with Chocolate
Melt the chocolate chips together with coconut oil in a small bowl—use a microwave in short bursts or a double boiler for smooth melting. Whisk the mixture until glossy and fluid. Dip each cut bar into the chocolate, making sure it’s fully coated. Place the coated bars on a parchment-lined plate and repeat until all are dipped. This rich chocolate shell adds the final layer of indulgence and keeps the bars together beautifully.
Step 7: Final Chill
Pop your dipped Healthy Homemade Butterfingers back into the freezer for about 10 minutes. This quick chill allows the chocolate coating to harden perfectly, locking in that satisfying crunch and rich flavor. Then they’re ready to enjoy right away, or to be stored for later moments of sweet satisfaction.
How to Serve Healthy Homemade Butterfingers
Garnishes
While these bars are delicious all on their own, you can elevate their look by sprinkling a pinch of flaky sea salt on top right after dipping in chocolate. The salt enhances the peanut butter and chocolate notes, creating a flavor burst with every bite. For an extra touch, a drizzle of melted white chocolate or a sprinkle of crushed peanuts can add texture and visual appeal.
Side Dishes
Healthy Homemade Butterfingers pair wonderfully with simple, fresh sides like sliced apples or a handful of fresh berries. The natural fruit acidity balances the richness of the bars, making for a well-rounded snack break. If you’re serving these at a party, fresh veggies with a light dip provide a refreshing counterpart.
Creative Ways to Present
Take your presentation up a notch by placing bars into mini paper cupcake liners for easy serving or arranging them on rustic wooden boards alongside nuts and dried fruits. Wrapping each bar individually in parchment paper and tying with twine makes for a charming homemade gift that friends and family will adore.
Make Ahead and Storage
Storing Leftovers
These Healthy Homemade Butterfingers keep best when stored in an airtight container in the refrigerator or freezer. In the fridge, they last about one week and remain firm and safe to eat, though the freezer is your best bet for longer storage. Just keep that container sealed tight to avoid any moisture or freezer burn.
Freezing
Place your butterfingers in a single layer on a parchment-lined tray and freeze until solid before transferring them to a zip-top bag or airtight container. Frozen, they can last up to three months without losing flavor or texture. This makes them an excellent option for meal prepping snacks or keeping on hand for last-minute cravings.
Reheating
Since these bars are meant to be enjoyed chilled and crisp, avoid traditional reheating methods. Simply let frozen bars thaw at room temperature for about 10 minutes before eating. This keeps the chocolate intact and the peanut butter center delightfully chewy.
FAQs
Can I use crunchy peanut butter instead of creamy?
Absolutely! Using crunchy peanut butter will add extra texture to your Healthy Homemade Butterfingers, making them even more interesting to bite into. Just be prepared for little peanut chunks distributed throughout the bars.
Is it necessary to use maple syrup or honey?
These natural sweeteners work best to bind the mixture and add that perfect touch of sweetness. You could experiment with agave or brown rice syrup, but maple syrup or honey provides the most balanced flavor and texture here.
Can I substitute corn flakes with another cereal?
You can, but keep in mind that corn flakes have a light, airy crunch that contributes to the classic Butterfingers texture. Other cereals like Rice Krispies or crushed bran flakes might work but will change the overall feel and taste of the bars.
What type of chocolate is best for coating?
Dark or semi-sweet chocolate chips melt well and provide a rich contrast to the nutty interior. Milk chocolate is also an option if you prefer something sweeter, but darker chocolate keeps the snack on the healthier side and balances the peanut flavor.
How do I prevent the chocolate from melting too quickly when dipping?
Mixing in coconut oil helps thin the chocolate for easy dipping and encourages it to set quickly. Also, work in small batches and refrigerate or freeze the dipped bars right away to keep everything firm and prevent melting.
Final Thoughts
Making Healthy Homemade Butterfingers at home is such a rewarding experience that you’ll want to make them again and again. They’re perfect for those moments when you want a satisfying treat without turning to store-bought candy loaded with unrecognizable ingredients. Give this recipe a try, share them with your loved ones, and enjoy a little homemade happiness that tastes just as good as it feels!
Print
Healthy Homemade Butterfingers Recipe
- Total Time: 1 hour 25 minutes
- Yield: 12 bars 1x
- Diet: Vegetarian
Description
These Healthy Homemade Butterfingers are a delightful twist on the classic candy bar, made with wholesome ingredients like peanut butter, corn flakes, and natural sweeteners. Coated in rich melted chocolate, these bars are crunchy, sweet, and perfect for a guilt-free treat or snack.
Ingredients
Base Mixture
- 1 cup peanut butter
- 1/3 cup maple syrup or honey
- 2 cups corn flakes
Chocolate Coating
- 1 cup chocolate chips
- 2 teaspoons coconut oil
Instructions
- Crush the Corn Flakes: Add the corn flakes to a large zip-top bag, seal it, and crush the cereal into small pieces using your hands or a rolling pin to ensure even texture.
- Combine Wet Ingredients: In a large bowl, mix the peanut butter and maple syrup or honey until fully blended, creating a sticky and sweet base.
- Mix in Cereal: Add the crushed corn flakes to the peanut butter mixture and stir well until all the flakes are fully coated and combined into a cohesive mixture.
- Press Into Pan: Line a loaf pan with parchment paper and transfer the mixture into it. Press down firmly to create an even, compact layer. Place the pan in the freezer for at least one hour to harden.
- Cut Into Bars: Remove the hardened mixture from the pan using the parchment paper as a lift. Place on a cutting board and slice into 12 evenly sized bars.
- Melt Chocolate Coating: In a microwave-safe bowl, melt the chocolate chips with the coconut oil in 20-second intervals, stirring until smooth and glossy.
- Coat Each Bar: Dip each bar completely into the melted chocolate using a fork or your hands, ensuring it’s fully coated. Place coated bars on a parchment-lined plate to set.
- Set the Chocolate: Transfer the coated bars to the freezer for about 10 minutes until the chocolate hardens.
- Store or Serve: Enjoy immediately or store in an airtight container in the freezer for up to 3 months for best freshness.
Notes
- Use natural peanut butter without added sugar or oils for a healthier option.
- Maple syrup is a great vegan sweetener substitute for honey.
- Press the mixture firmly into the pan to prevent the bars from crumbling.
- For a nut-free version, substitute peanut butter with sunflower seed butter and ensure corn flakes are gluten-free.
- Store bars in the freezer to maintain firmness and freshness.
- Prep Time: 15 minutes
- Cook Time: 10 minutes
- Category: Snack, Dessert
- Method: No-bake, Freezing
- Cuisine: American
Nutrition
- Serving Size: 1 bar (approx. 40 grams)
- Calories: 190 kcal
- Sugar: 10 g
- Sodium: 60 mg
- Fat: 12 g
- Saturated Fat: 5 g
- Unsaturated Fat: 6 g
- Trans Fat: 0 g
- Carbohydrates: 18 g
- Fiber: 2 g
- Protein: 5 g
- Cholesterol: 0 mg
Keywords: Healthy Butterfingers, Homemade Candy Bars, No-bake Snack, Peanut Butter Bars, Gluten Free Snack, Easy Dessert
