
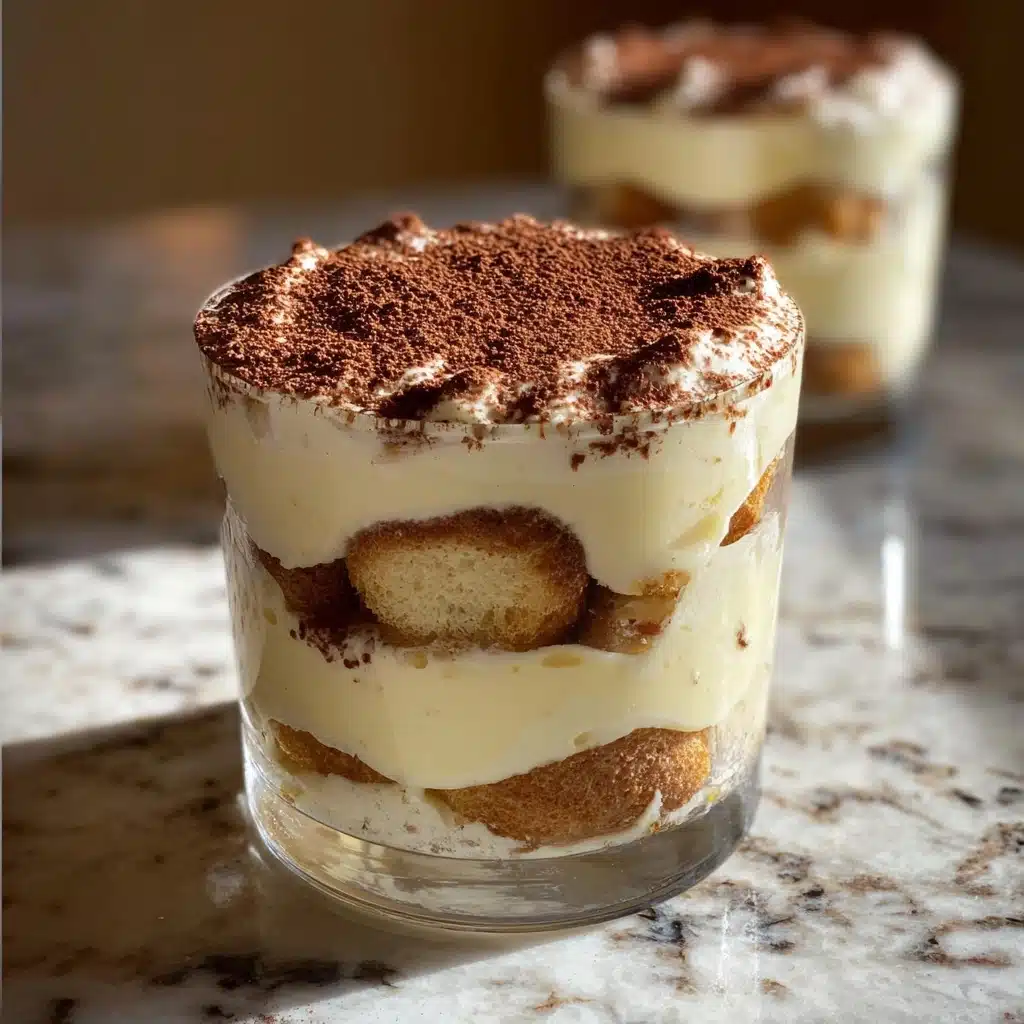
Mini No-Bake Tiramisu Cups: 5 Steps to Dessert Bliss Recipe
If you’re craving a luscious dessert that’s both elegant and effortless, these Mini No-Bake Tiramisu Cups: 5 Steps to Dessert Bliss are your perfect go-to treat. Each bite captures the classic flavors of traditional tiramisu, creamy mascarpone mingling with hints of coffee and a delicate dusting of cocoa, all without turning on your oven. These individual cups not only make serving a breeze but also feel like a charming little indulgence that’s sure to impress friends and family alike. Let me walk you through this simple, rewarding recipe that brings timeless Italian dessert magic directly to your table.
Ingredients You’ll Need
Gathering the right ingredients is key to making these Mini No-Bake Tiramisu Cups come alive with flavor and silkiness. Each element plays a part in balancing richness, sweetness, and texture to give you the perfect handheld dessert delight.
- 1 cup mascarpone cheese: The rich, creamy heart of tiramisu that makes each spoonful melt in your mouth.
- 1 cup heavy cream: Adds fluffiness and volume when whipped, lightening the mascarpone into a dreamy filling.
- 1/2 cup powdered sugar: Sweetens gently without granules, blending seamlessly for smoothness.
- 1 cup brewed coffee, cooled: Infuses the ladyfingers with just the right robust bitterness to cut through the creaminess.
- 1 package ladyfingers: The classic sponge base that soaks up coffee perfectly and adds delightful texture.
- Cocoa powder for dusting: A final flourish that brings aromatic bittersweet contrast and classic visual appeal.
How to Make Mini No-Bake Tiramisu Cups: 5 Steps to Dessert Bliss
Step 1: Whip Up the Creamy Mascarpone Mixture
In a mixing bowl, combine the mascarpone cheese, heavy cream, and powdered sugar. Whisk them together until you reach soft peaks—this means when you lift the whisk, the mixture holds a gentle shape but remains airy and luscious. This step is crucial because this creamy blend forms the luscious layers that make every bite heavenly.
Step 2: Prepare the Coffee Dip for the Ladyfingers
Make sure your brewed coffee is fully cooled before you start dipping. Take each ladyfinger and dip it briefly into the coffee—just long enough to soak the surface without making it soggy. This delicate soaking allows the ladyfingers to absorb that rich coffee flavor while remaining structurally firm enough to support the layers.
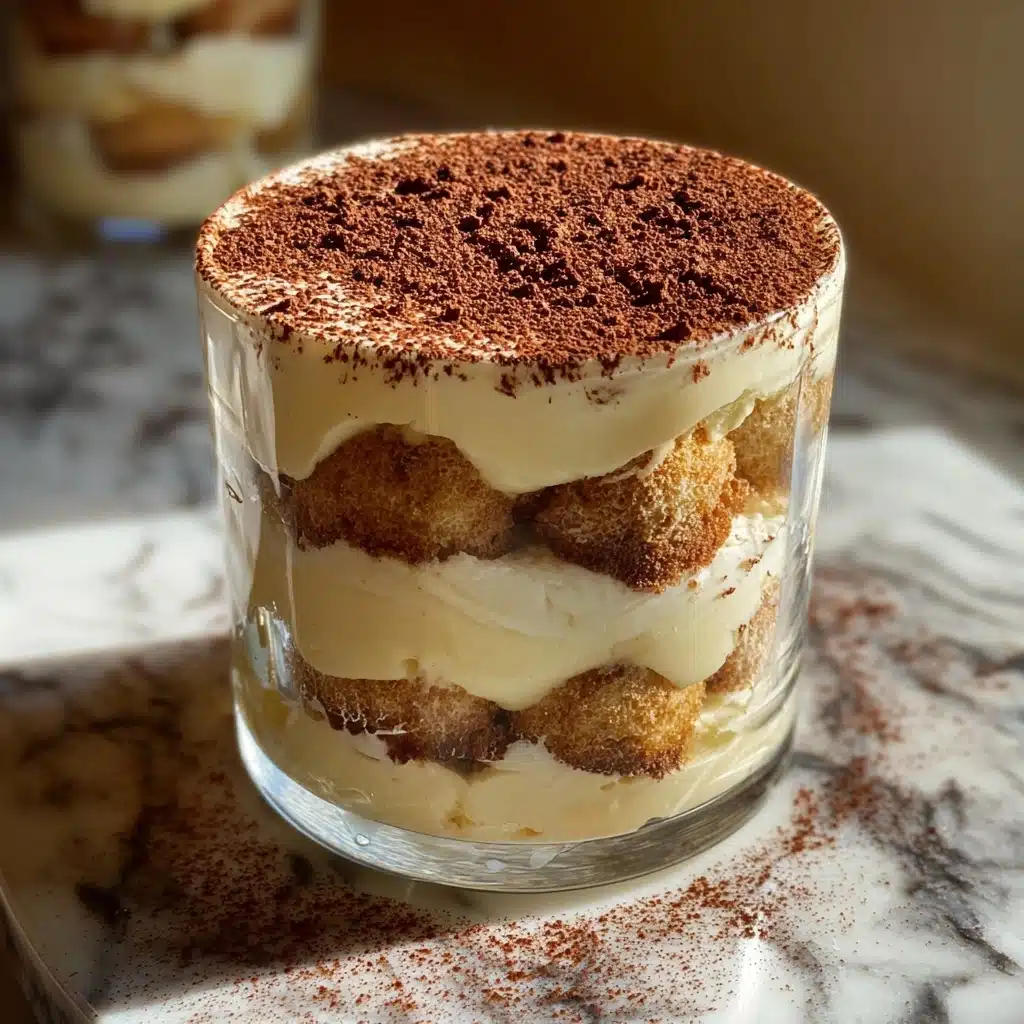
Step 3: Layer the Ladyfingers in Your Cups
Begin by placing a layer of the coffee-dipped ladyfingers at the bottom of your chosen cups or glasses. This foundation sets the stage for the creamy layers to come. The mini cups make this process fun and visually appealing because you can see the beautiful layers develop with each spoonful added.
Step 4: Add the Mascarpone Mixture Over the Ladyfingers
Using a spoon or piping bag, add a generous layer of the whipped mascarpone mixture over the ladyfingers. Smooth it out gently to ensure even coverage. This layer provides that signature creamy richness that balances the coffee-soaked base perfectly.
Step 5: Repeat Layers and Finish with Cocoa Powder
Repeat alternating layers of dipped ladyfingers and mascarpone mixture until the cups are filled to your liking. End with a dusting of cocoa powder on top to give that final, classic tiramisu touch—slightly bitter, visually stunning, and utterly inviting. Pop them into the fridge and chill for at least 2 hours, allowing the flavors to meld into dessert bliss.
How to Serve Mini No-Bake Tiramisu Cups: 5 Steps to Dessert Bliss
Garnishes
Think about enhancing your tiramisu cups with a few thoughtful garnishes. Fresh chocolate shavings, a sprig of mint, or a light dusting of cinnamon all work beautifully. These simple touches not only add an extra burst of aroma but make your dessert feel even more special when sharing with guests.
Side Dishes
While these tiramisu cups are incredible on their own, pairing them with fresh berries or a scoop of vanilla gelato can elevate the experience. The tartness of berries adds a refreshing contrast to the creamy sweetness, while gelato amplifies the indulgence factor without overpowering the classic tiramisu flavors.
Creative Ways to Present
Mini dessert cups offer so much room for creativity! Try layering them in clear mason jars for a rustic vibe or elegant martini glasses for a touch of sophistication. You can add edible flowers on top or arrange a tiramisu dessert platter featuring these cups alongside espresso shots for a gorgeous presentation everyone will remember.
Make Ahead and Storage
Storing Leftovers
These mini delights keep wonderfully in the refrigerator for up to 3 days. Cover each cup tightly with plastic wrap or store them in an airtight container to prevent any absorption of fridge odors and maintain their creamy texture and fresh coffee essence.
Freezing
If you need to prep ahead, you can freeze the cups, but be aware the texture might shift slightly upon thawing. Freeze them uncovered for about an hour for a quick chill, then cover with plastic wrap and freeze for up to one month. Thaw in the refrigerator overnight for best results before serving.
Reheating
Since this is a no-bake, chilled dessert, reheating isn’t typically recommended as it can cause separation or loss of that smooth creaminess you love. Serve them cold straight from the fridge for the perfect tiramisu experience.
FAQs
Can I use instant coffee instead of brewed coffee?
Absolutely! Dissolving instant coffee granules in hot water and letting it cool works perfectly for dipping ladyfingers and infusing that rich coffee flavor.
What if I don’t have mascarpone cheese?
You can substitute mascarpone with a mix of cream cheese and heavy cream, but keep in mind mascarpone’s distinct taste and texture are iconic for tiramisu. The substitution can still be delicious but slightly different.
How long should I chill the Mini No-Bake Tiramisu Cups?
Chilling for at least 2 hours is essential to let the layers set and flavors marry beautifully. If possible, chilling overnight will deepen the flavor even more.
Can I make these cups gluten-free?
Yes! Just swap out the ladyfingers for gluten-free sponge fingers or biscuits. The rest of the recipe remains the same and equally delightful.
Is it possible to make these in larger portions instead of mini cups?
Definitely! You can layer the dessert in a larger trifle dish following the same steps. Mini cups, though, make portion control easier and look adorable for parties.
Final Thoughts
There is something so satisfying about these Mini No-Bake Tiramisu Cups: 5 Steps to Dessert Bliss that keeps me coming back for more—they are simple to put together but deliver big on flavor and charm. Whether it’s a casual get-together or a special occasion, this no-fuss dessert is sure to impress and delight. Give it a try, and enjoy the joy of making (and eating) a truly irresistible Italian classic!
Print
Mini No-Bake Tiramisu Cups: 5 Steps to Dessert Bliss Recipe
- Total Time: 2 hours 15 minutes
- Yield: 6 servings 1x
- Diet: Vegetarian
Description
Mini No-Bake Tiramisu Cups are an easy and elegant dessert that layers coffee-soaked ladyfingers with a luscious mascarpone cream. Perfect for individual servings, these cups offer all the classic flavors of tiramisu without the need for baking, making them a quick and impressive treat for dessert lovers.
Ingredients
Mascarpone Mixture
- 1 cup mascarpone cheese
- 1 cup heavy cream
- 1/2 cup powdered sugar
Other Ingredients
- 1 cup brewed coffee, cooled
- 1 package ladyfingers (about 24–30 pieces)
- Cocoa powder for dusting
Instructions
- Prepare the mascarpone mixture: In a large bowl, combine the mascarpone cheese, heavy cream, and powdered sugar. Using a handheld mixer or stand mixer, whip the mixture until soft peaks form, ensuring it is smooth and fluffy.
- Dip the ladyfingers: Quickly dip each ladyfinger into the cooled brewed coffee just long enough to soak but not become soggy. The ladyfingers should be moist but still hold their structure.
- Layer the cups: Place a layer of the dipped ladyfingers at the bottom of individual serving cups or glasses. This will form the base of the dessert.
- Add mascarpone layers: Spoon a generous layer of the whipped mascarpone mixture over the ladyfingers. Repeat the layers—ladyfingers followed by mascarpone mixture—until the cups are filled, ending with a mascarpone layer.
- Chill and dust: Dust the top of each cup with cocoa powder to add classic tiramisu flavor and a beautiful finish. Refrigerate the cups for at least 2 hours to allow the flavors to meld and the dessert to set before serving.
Notes
- Use strong brewed coffee or espresso for a more intense coffee flavor.
- If you prefer a boozy tiramisu, add a tablespoon of coffee liqueur like Kahlúa to the brewed coffee.
- Serve chilled and consume within 2 days for the best texture and freshness.
- For a lighter version, substitute heavy cream with whipped coconut cream to make it dairy-free and vegan-friendly.
- Ensure ladyfingers are dipped quickly to prevent them from becoming too soggy.
- Prep Time: 15 minutes
- Cook Time: 0 minutes
- Category: Dessert
- Method: No-bake
- Cuisine: Italian
Nutrition
- Serving Size: 1 cup (about 150g)
- Calories: 320
- Sugar: 18g
- Sodium: 50mg
- Fat: 24g
- Saturated Fat: 15g
- Unsaturated Fat: 7g
- Trans Fat: 0g
- Carbohydrates: 20g
- Fiber: 1g
- Protein: 5g
- Cholesterol: 85mg
Keywords: tiramisu, no-bake dessert, mini tiramisu cups, easy tiramisu, coffee dessert, mascarpone cream dessert

