
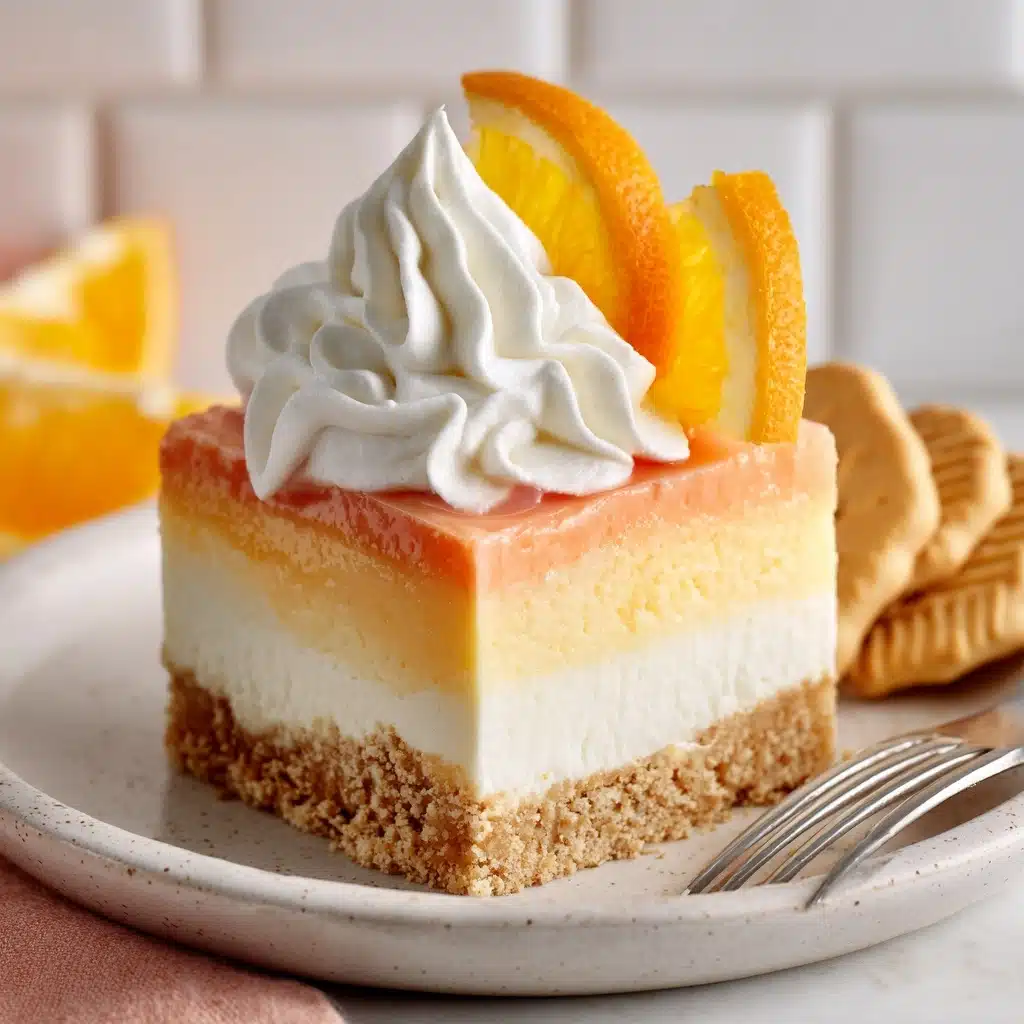
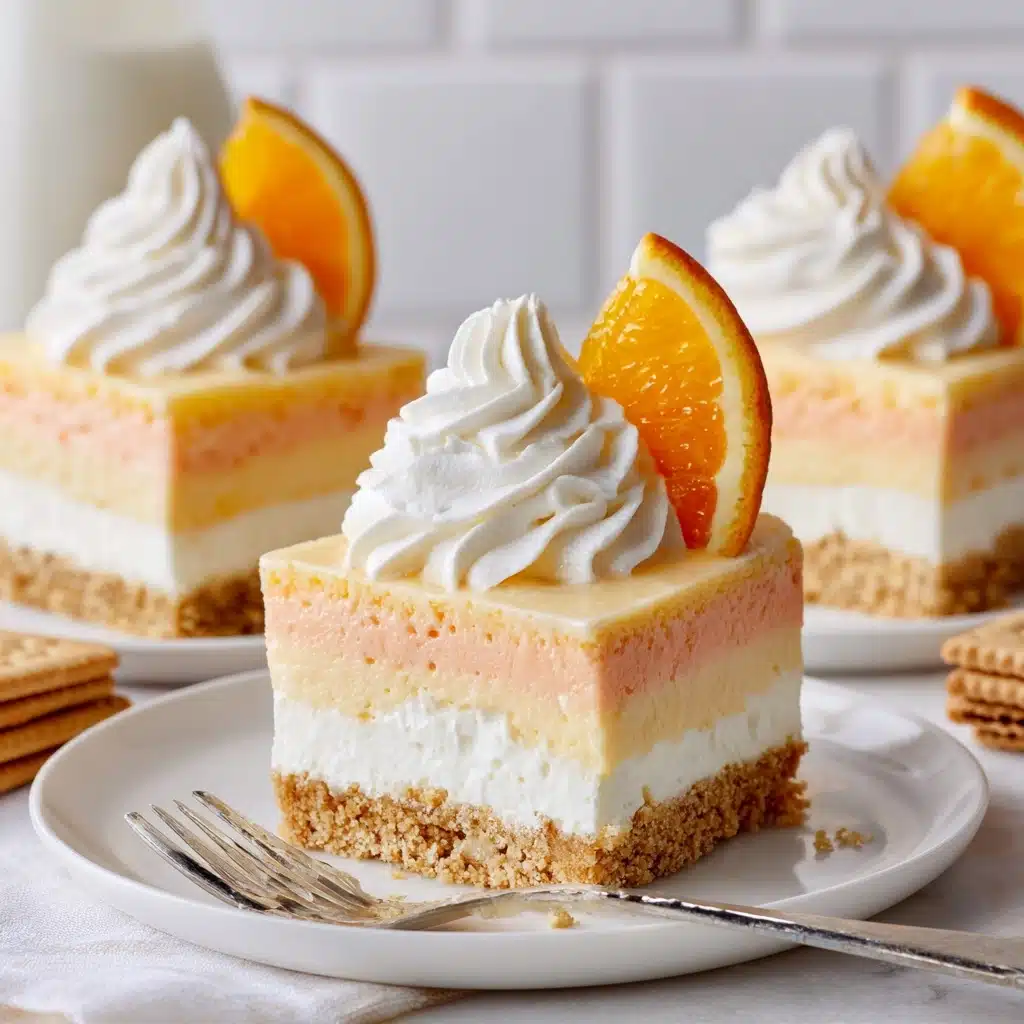
Orange Creamsicle Dream Bars Recipe
If you ever dreamed of spooning up summer sunshine, these Orange Creamsicle Dream Bars are your ticket straight to nostalgic bliss. Imagine layers of zesty orange cream and rich cheesecake cradled on a buttery Nilla Wafer crust—each bite is a throwback to those beloved creamsicle pops, but in the form of a gorgeously sliceable dessert bar. The contrasting textures and swirls of citrus and vanilla make them irresistibly creamy and refreshing, earning them a spot at any celebration or just because you’re craving something special.
Ingredients You’ll Need
You’ll be amazed at how these simple ingredients, each with a distinct role, come together to create the unmistakable flavors of Orange Creamsicle Dream Bars. Every item brings something important—whether that’s creaminess, tang, crunch, or a pop of color.
- Cool Whip: Adds airy lightness to each creamy layer, making every bite melt-in-your-mouth.
- Nilla Wafer Cookie Crumbs: The sweet, buttery base that holds everything together while adding classic vanilla flavor.
- Unsalted Butter: Brings richness to the crust and ensures it’s perfectly cohesive and sliceable.
- Orange Gelatin: Delivers the bold, tangy orange punch that sets the creamsicle vibe front and center.
- Boiling Water: Dissolves the gelatin, so the layers set up just right.
- Cold Water: Helps cool down the gelatin for smooth, even mixing.
- Cream Cheese (room temperature): Essential for both the orange cream and cheesecake layers, giving luscious, tangy creaminess that balances the sweetness.
- Powdered Sugar: Dissolves easily into the orange cream base, sweetening without any grainy texture.
- Orange Extract: Intensifies the citrus aroma for that dreamy creamsicle aroma.
- Orange Wilton Gel Food Color (optional): Makes those orange layers pop visually, perfect for an extra wow-factor.
- Confectioners’ Sugar: Ultra-smooth, finishing the cheesecake layer with gentle sweetness.
- Pure Vanilla Extract: Deepens the vanilla notes in the cheesecake, tying together the creamsicle theme.
How to Make Orange Creamsicle Dream Bars
Step 1: Prepare the Nilla Wafer Crust
Start by lining an 8 x 8-inch pan with parchment paper—trust me, this step is a lifesaver when it comes to getting clean, even slices later. Crush your Nilla Wafers in a food processor until you have fine crumbs, then mix them with melted unsalted butter. Press this golden mixture evenly into your prepared pan, creating a solid crust. Chill in the freezer for at least 30 minutes, letting the base firm up while you prep the next layers.
Step 2: Mix the Orange Gelatin
In a glass measuring cup, combine your orange gelatin with boiling water, stirring until the powder is completely dissolved. Then, stir in the cold water. Pop this mixture in the fridge just until it cools—about 10 minutes. You want it cold, but not yet set, so it’ll blend smoothly into your creamy filling.
Step 3: Whip Up the Orange Cream Layer
Beat 8 ounces of softened cream cheese with powdered sugar, orange extract, and if you want an extra vibrant look, a few drops of orange gel food color. Once creamy and well blended, slowly add the cooled (but not set) gelatin, mixing thoroughly for a silky texture. Chill this mixture in the fridge for about an hour until it thickens slightly—patience pays off for the dreamiest layers.
Step 4: Create the Cheesecake Layer
In another bowl, whip the remaining 8 ounces of cream cheese with confectioners’ sugar and vanilla extract until soft and creamy. Gently fold in a cup of Cool Whip—this keeps the texture fluffy and light. Next, spread dollops of this mixture over the chilled Nilla Wafer crust. Use an offset spatula to get an even, smooth layer.
Step 5: Fold and Layer the Orange Cream
Once your orange cream has thickened, gently fold in the remaining 2 cups of Cool Whip. This gives the orange layer its signature mousse-like fluff. Carefully spoon and spread this dreamy orange cream over your cheesecake layer, leveling it gently with an offset spatula for a beautiful finish.
Step 6: Chill to Perfection
Place the entire pan in the refrigerator, uncovered, for at least 6 hours (or overnight if you can resist!). This lets each layer set up just right and the flavors meld into the Orange Creamsicle Dream Bars magic you’re craving.
How to Serve Orange Creamsicle Dream Bars
Garnishes
A dollop of extra Cool Whip, a sprinkle of crushed Nilla Wafers, or a twist of orange zest on each bar takes these treats from simple to stunning. For a pop of color, add a few dots of orange gel or slices of fresh mandarin on top just before serving.
Side Dishes
These bars pair beautifully with a fresh fruit salad or a light vanilla latte. If you’re going for a full dessert spread, try serving them alongside mini lemon tarts or white chocolate-dipped strawberries to keep the citrusy, summery theme going.
Creative Ways to Present
Try cutting your Orange Creamsicle Dream Bars into bite-sized cubes and serving them on skewers for a party-friendly treat. Or, layer the components parfait-style in mason jars—so cute and so easy for picnics or potlucks!
Make Ahead and Storage
Storing Leftovers
Keep any leftover bars in an airtight container in the refrigerator. They stay fresh and delicious for up to four days, and the layers hold together perfectly—no soggy surprises!
Freezing
You can freeze the Orange Creamsicle Dream Bars tightly wrapped or in a lidded container for up to two months. For best results, slice before freezing and pop sheets of parchment between layers to keep them picture-perfect.
Reheating
No reheating required—these bars are at their best served chilled! If you’re taking them out of the freezer, simply let them thaw in the fridge overnight or sit at room temperature for about 30 minutes before enjoying.
FAQs
Can I make Orange Creamsicle Dream Bars ahead of time?
Absolutely, and it’s the best way to maximize flavor and texture! Make them the night before or up to two days in advance, store in the fridge, and they’ll slice beautifully whenever you’re ready to serve.
What can I use if I don’t have orange extract?
No worries! Substitute an equal amount of finely grated orange zest, or use orange juice concentrate for a natural, bright citrus flavor. It might be slightly less intense, but still totally delicious.
Can I use homemade whipped cream instead of Cool Whip?
Yes, you can! Just whip heavy cream with a little powdered sugar until stiff peaks form. Keep in mind that homemade whipped cream is less stable than Cool Whip, so the bars may soften faster at room temp.
How do I get the cleanest slices?
For those picture-perfect squares, chill the bars thoroughly, then use a hot, dry knife and wipe it clean between cuts. The parchment sling makes it easy to lift the whole batch out first, so you can slice with confidence.
Can I double the recipe for a bigger crowd?
Absolutely! Just use a 9 x 13-inch pan and double every ingredient. The Orange Creamsicle Dream Bars will be just as dreamy, and you’ll have plenty to share (or savor leftovers for days).
Final Thoughts
If you’re looking for a show-stopping treat that thrills both kids and adults, don’t wait another minute to whip up Orange Creamsicle Dream Bars. Every chilled, creamy bite is a nostalgic escape to summer days—and honestly, they’re just plain fun to eat. Gather your ingredients, invite some friends, and let the citrusy celebration begin!
Print
Orange Creamsicle Dream Bars Recipe
- Total Time: 6 hours 30 minutes
- Yield: 16 bars 1x
- Diet: Vegetarian
Description
These Orange Creamsicle Dream Bars are a delightful combination of creamy, citrusy flavors on a crunchy Nilla Wafer crust. Perfect for a refreshing dessert!
Ingredients
Nilla Wafer Crust:
- 1 ⅓ cups Nilla Wafer Cookie Crumbs
- 5 tablespoons unsalted butter
Orange Gelatin:
- 3 ounces orange gelatin
- 3/4 cup boiling water
- 3/4 cup cold water
Orange Cream Layer:
- 8 ounces cream cheese (room temperature)
- 1/4 cup powdered sugar
- 2 teaspoons orange extract
- 8 drops orange Wilton Gel Food Color (optional)
- 2 cups Cool Whip
Cheesecake Layer:
- 8 ounces cream cheese (room temperature)
- 1 cup confectioners’ sugar
- 1 teaspoon pure vanilla extract
- 1 cup Cool Whip
Instructions
- Nilla Wafer Crust – Line a 8 X 8-inch baking pan with parchment. Melt butter, mix with Nilla Wafer crumbs, press into pan, and freeze.
- Orange Gelatin – Dissolve gelatin in boiling water, add cold water, cool in the fridge.
- Orange Cream Layer – Beat cream cheese, sugar, extract, and food color. Mix in gelatin, chill.
- Cheesecake Layer – Beat cream cheese, sugar, and vanilla. Fold in Cool Whip. Spread over crust.
- Mix remaining Cool Whip with chilled Orange Cream, pour over cheesecake layer. Chill overnight.
Notes
- For a smoother texture, pour the gelatin mix slowly into the cream cheese mixture.
- Prep Time: 30 minutes
- Cook Time: 0 minutes
- Category: Dessert
- Method: Mixing, Chilling
- Cuisine: American
Nutrition
- Serving Size: 1 bar
- Calories: 280
- Sugar: 18g
- Sodium: 240mg
- Fat: 20g
- Saturated Fat: 12g
- Unsaturated Fat: 6g
- Trans Fat: 0g
- Carbohydrates: 24g
- Fiber: 0g
- Protein: 3g
- Cholesterol: 60mg
Keywords: Orange Creamsicle Dream Bars, Dessert, Creamy, Citrus, Nilla Wafers, Cool Whip

