
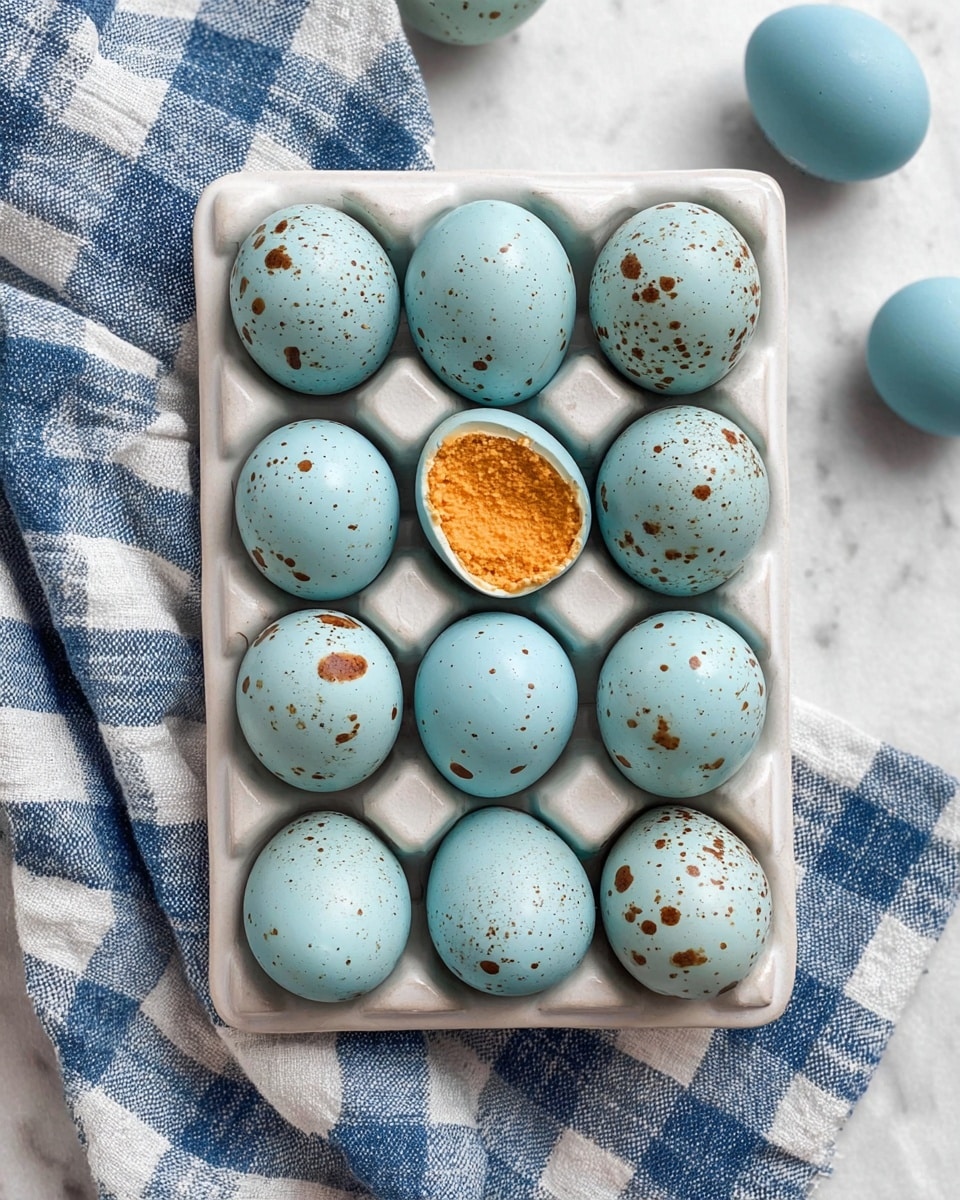
Peanut Butter Easter Eggs with Blue Spirulina and Matcha Recipe
Introduction
These Peanut Butter Easter Eggs are a delightful treat combining creamy peanut butter filling with a smooth white chocolate coating. Perfect for springtime celebrations, they offer a beautiful homemade twist on a classic candy.

Ingredients
- 1 1/4 cup natural, runny peanut butter (no sugar added)
- 1/4 cup maple syrup
- 1/4 cup powdered sugar
- 1/3 cup almond flour
- 1/2 teaspoon vanilla extract
- Pinch of salt
- 8 ounces white chocolate melting wafers (we use Ghirardelli brand)
- 2 teaspoons coconut oil
- 1/2 teaspoon blue spirulina + 1/4 teaspoon matcha powder (or use a 2:1 ratio of any blue and green food dye)
- For the speckles: 1 teaspoon cocoa powder + 1 tablespoon water
Instructions
- Step 1: In a mixing bowl, beat together the peanut butter, maple syrup, powdered sugar, almond flour, vanilla extract, and salt until well combined.
- Step 2: Portion the peanut butter filling into 2-tablespoon portions. Roll each one into a ball using your hands, then shape the ball into an oval (egg-shaped).
- Step 3: Place shaped eggs on a parchment paper-lined baking sheet and freeze while you prepare the coating.
- Step 4: In a small bowl, whisk together the cocoa powder and water for the speckles and set aside.
- Step 5: Add the white chocolate and coconut oil to a microwave-safe bowl. Microwave in 15-20 second intervals, stirring well between each, until fully melted.
- Step 6: Whisk in the spirulina and matcha powder (or your chosen food dyes) and adjust the colors as desired. Pour the melted chocolate into a short drinking glass or similar vessel.
- Step 7: With the eggs still semi-frozen, stick a toothpick into the bottom of each one and dip it into the white chocolate. Let excess chocolate drip off, then wait until the coating is mostly hardened before returning eggs to the parchment paper and removing the toothpick immediately to prevent cracking.
- Step 8: To add speckles, dip a pastry brush into the cocoa powder and water mixture. Hold it about 8 inches above the baking sheet and flick the brush tip over the eggs to create speckles. Be prepared for some mess—wear an apron!
- Step 9: Refrigerate the eggs until the chocolate coating dries completely, about 10 minutes.
Tips & Variations
- Use natural, runny peanut butter without added sugar for a balanced flavor and smooth texture.
- To make vegan or dairy-free, ensure the white chocolate wafers are dairy-free, or substitute with vegan white chocolate.
- Experiment with different natural dye powders or food coloring to customize the egg colors.
- If you don’t have a pastry brush, use a small stiff paintbrush or even a clean toothbrush for speckles.
Storage
Store the Peanut Butter Easter Eggs in an airtight container in the refrigerator for up to one week. For longer storage, freeze them for up to a month and thaw in the fridge before serving. If the coating softens, let the eggs sit at room temperature for a few minutes before enjoying.
How to Serve
Serve this delicious recipe with your favorite sides.
FAQs
Can I use crunchy peanut butter instead of smooth?
Yes, but the texture will be slightly more rustic. The eggs may feel a bit grainier, so smooth peanut butter is better for a creamy filling.
What if I don’t have almond flour?
You can substitute with finely ground oats or coconut flour, but adjust the quantity slightly as these absorb liquids differently.
Print
Peanut Butter Easter Eggs with Blue Spirulina and Matcha Recipe
- Total Time: 30 minutes
- Yield: Approximately 16 eggs 1x
- Diet: Gluten Free
Description
Delicious and festive Peanut Butter Easter Eggs coated in vibrant white chocolate with natural blue and green colors, finished with cocoa speckles. These no-bake treats combine creamy peanut butter, maple syrup, almond flour, and vanilla into a smooth filling, perfect for holiday celebrations or gifting.
Ingredients
Peanut Butter Filling
- 1 1/4 cup natural, runny peanut butter (no sugar added)
- 1/4 cup maple syrup
- 1/4 cup powdered sugar
- 1/3 cup almond flour
- 1/2 teaspoon vanilla extract
- Pinch of salt
White Chocolate Coating
- 8 ounces white chocolate melting wafers (Ghirardelli recommended)
- 2 teaspoons coconut oil
- 1/2 teaspoon blue spirulina
- 1/4 teaspoon matcha powder (or use a 2:1 ratio of any blue and green food dye)
Speckles
- 1 teaspoon cocoa powder
- 1 tablespoon water
Instructions
- Prepare the Peanut Butter Filling: In a mixing bowl, beat together the natural runny peanut butter, maple syrup, powdered sugar, almond flour, vanilla extract, and a pinch of salt until the mixture is smooth and well combined.
- Shape the Eggs: Portion the peanut butter filling into 2-tablespoon servings. Roll each portion into a ball with your hands, then carefully shape each ball into an oval, mimicking the shape of an egg.
- Freeze the Filling: Place the shaped eggs on a baking sheet lined with parchment paper and freeze them while you prepare the coating. This helps the chocolate adhere better and prevents pooling.
- Make Cocoa Speckle Mixture: In a small bowl, whisk together the cocoa powder and water until smooth, then set aside.
- Melt the White Chocolate: Combine the white chocolate melting wafers and coconut oil in a microwave-safe bowl. Microwave in 15-20 second intervals, stirring thoroughly between each interval, until the chocolate is completely melted and smooth.
- Color the Chocolate: Whisk the blue spirulina and matcha powder (or chosen food dyes) into the melted white chocolate. Adjust the colors to your preference. Pour the colored chocolate into a short drinking glass or similar vessel for easy dipping.
- Coat the Eggs: Working with the semi-frozen eggs, insert a toothpick into the bottom of one egg and dip it carefully into the colored white chocolate. Let any excess chocolate drip off. Allow the chocolate to almost harden before transferring the egg to the parchment-lined baking sheet and gently removing the toothpick to avoid cracking.
- Create the Speckles: Dip a pastry brush into the cocoa powder and water mixture and hold it about 8 inches above the coated eggs. Flick the brush with your finger to create cocoa speckles over the eggs. Wear an apron as this step can get messy.
- Set and Chill: Refrigerate the eggs until the chocolate coating fully dries and hardens, about 10 minutes. They are then ready to enjoy or gift.
Notes
- Using semi-frozen peanut butter eggs helps the chocolate to harden quickly and prevents pooling.
- You can substitute the natural blue spirulina and matcha for any blue and green food coloring in a 2:1 ratio.
- When dipping, removing the toothpick at the right time prevents cracking in the chocolate coating.
- Speckling with cocoa powder adds a beautiful rustic look but can be messy; wear an apron and consider doing this on a surface that is easy to clean.
- Store the finished eggs in the refrigerator to keep them firm and fresh.
- Prep Time: 20 minutes
- Cook Time: 10 minutes
- Category: Dessert
- Method: No-Cook
- Cuisine: American
Keywords: Peanut Butter Easter Eggs, White Chocolate Coating, No-Bake Easter Treats, Healthy Peanut Butter Candy, Gluten Free Easter Recipe
